Custom Scope for Spring Bean
One of the speciality of spring framework is the options it provide for customization. In the last article we saw about spring bean scopes available as part of standard implementation. In this article we shall see about custom scope that is available from Spring 2.0
Based on spring custom scope, we can define new scope as well as modify out of the box provided spring bean scopes. We will not be able to modify the standard singleton and prototype scopes but we can modify the request, session and global_session scopes. Though spring framework provides option to modify the existing scopes, its better not to touch it and also I don’t see any real use case that asks for overriding existing scopes.
Example scenarios where we can use spring bean custom scope are in,
org.springframework.beans.factory.config.Scope is an interface and by implementing it we create a custom scope in the spring container. This Scope interface contains four methods,
2. Register the created custom bean
Once we create the custom spring bean scope we need to register it with the spring container. There are two ways to do it. Either through programmatic registration or using conventional XML based configuration. For programmatic registration, we should get the bean factory and call the registerScope method as below,
Spring Batch
This is an introductory tutorial to Spring Batch. It does not aim to provide a complete guide to the framework but rather to facilitate the first contact. Spring Batch is quite rich in functionalities, and this is basically how I started learning it. Keep in mind that we will only be scratching the surface.
Before we start
All the examples will have the lofty task of printing "Hello World!" though in different ways. They were developed with Spring Batch 1.0. I'll provide a Maven 2 project and I'll run the examples with Maven but of course it is not a requirement to work with Spring Batch.
Spring Batch in 2 Words
Fortunately, Spring Batch model objects have self-explanatory names. Let's try to enumerate the most important and to link them together:
A batch Job is composed of one or more Steps. A JobInstance represents a given Job, parametrized with a set of typed properties called JobParameters. Each run of of a JobInstance is a JobExecution. Imagine a job reading entries from a data base and generating an xml representation of it and then doing some clean-up. We have a Job composed of 2 steps: reading/writing and clean-up. If we parametrize this job by the date of the generated data then our Friday the 13th job is a JobInstance. Each time we run this instance (if a failure occurs for instance) is a JobExecution. This model gives a great flexibility regarding how jobs are launched and run. This naturally brings us to launching jobs with their job parameters, which is the responsibility of JobLauncher. Finally, various objects in the framework require a JobRepository to store runtime information related to the batch execution. In fact, Spring Batch domain model is much more elaborate but this will suffice for our purpose.
Well, it took more than 2 words and I feel compelled to make a joke about it, but I won't. So let's move to the next section.
Common Objects
For each job, we will use a separate xml context definition file. However there is a number of common objects that we will need recurrently. I will group them in an applicationContext.xml which will be imported from within job definitions. Let's go through these common objects:
JobLauncher
JobLaunchers are responsible for starting a Job with a given job parameters. The provided implementation, SimpleJobLauncher, relies on a TaskExecutor to launch the jobs. If no specific TaskExecutor is set then a SyncTaskExecutor is used.
JobRepository
We will use the SimpleJobRepository implementation which requires a set of execution Daos to store its information.
JobInstanceDao, JobExecutionDao, StepExecutionDao
These data access objects are used by SimpleJobRepository to store execution related information. Two sets of implementations are provided by Spring Batch: Map based (in-memory) and Jdbc based. In a real application the Jdbc variants are more suitable but we will use the simpler in-memory alternative in this example.
Here's our applicationContext.xml:
01.<beans xmlns="http://www.springframework.org/schema/beans"
02.xmlns:xsi="http://www.w3.org/2001/XMLSchema-instance"
03.xsi:schemaLocation="http://www.springframework.org/schema/beans
04.http://www.springframework.org/schema/beans/spring-beans-2.5.xsd">
05.<bean id="jobLauncher" class="org.springframework.batch.core.launch.support.SimpleJobLauncher">
06.<property name="jobRepository" ref="jobRepository"/>07.</bean>
08.
09.<bean id="jobRepository" class="org.springframework.batch.core.repository.support.SimpleJobRepository">
10.<constructor-arg>
11.<bean class="org.springframework.batch.core.repository.dao.MapJobInstanceDao"/>
12.</constructor-arg>
13.<constructor-arg>
14.<bean class="org.springframework.batch.core.repository.dao.MapJobExecutionDao" />
15.</constructor-arg>
16.<constructor-arg>
17.<bean class="org.springframework.batch.core.repository.dao.MapStepExecutionDao"/>
18.</constructor-arg>
19.</bean>
20.
21.</beans>
Hello World with TaskletsA tasklet is an object containing any custom logic to be executed as a part of a job. Tasklets are built by implementing the Tasklet interface. Let's implement a simple tasklet that simply prints a message:
01.public class PrintTasklet implements Tasklet{
02.
03.private String message;
04.
05.public void setMessage(String message) {
06.this.message = message;
07.
}
08.
09.public ExitStatus execute() throws Exception {
10.System.out.print(message);
11.return ExitStatus.FINISHED;
12.}
13.}
Notice that the execute method returns an ExitStatus to indicate the status of the execution of the tasklet.
We will define our first job now in a simpleJob.xml application context. We will use the SimpleJob implementation which executes all of its steps sequentailly. In order to plug a tasklet into a job, we need a TaskletStep. I also added an abstract bean definition for tasklet steps in order to simplify the configuration:
01.<beans xmlns="http://www.springframework.org/schema/beans"
02.xmlns:xsi="http://www.w3.org/2001/XMLSchema-instance"
03.xsi:schemaLocation="http://www.springframework.org/schema/beans
04.http://www.springframework.org/schema/beans/spring-beans-2.5.xsd">
05.<import resource="applicationContext.xml"/>
06.
07.<bean id="hello" class="helloworld.PrintTasklet">
08.<property name="message" value="Hello"/>
09.</bean>
10.
11.<bean id="space" class="helloworld.PrintTasklet">
12.<property name="message" value=" "/>
13.</bean>
14.
15.<bean id="world" class="helloworld.PrintTasklet">
16.<property name="message" value="World!"/>
17.</bean>
18.
19.<bean id="taskletStep" abstract="true"
20.class="org.springframework.batch.core.step.tasklet.TaskletStep">
21.<property name="jobRepository" ref="jobRepository"/>
22.</bean>
23.
24.<bean id="simpleJob" class="org.springframework.batch.core.job.SimpleJob">
25.<property name="name" value="simpleJob" />
26.<property name="steps">
27.<list>
28.<bean parent="taskletStep">
29.<property name="tasklet" ref="hello"/>
30.</bean>
31.<bean parent="taskletStep">
32.<property name="tasklet" ref="space"/>
33.</bean>
34.<bean parent="taskletStep">;
35.<property name="tasklet" ref="world"/>
36.</bean>
37.</list>
38.</property>
39.<property name="jobRepository" ref="jobRepository"/>
40.</bean>
41.</beans>
Running the JobNow we need something to kick-start the execution of our jobs. Spring Batch provides a convenient class to achieve that from the command line: CommandLineJobRunner. In its simplest form this class takes 2 arguments: the xml application context containing the job to launch and the bean id of that job. It naturally requires a JobLauncher to be configured in the application context. Here's how to launch the job with Maven. Of course, it can be run with the java command directly (you need to specify the class path then):
mvn exec:java -Dexec.main.springframework.batch.core.launch.support.CommandLineJobRunner -Dexec.args="simpleJob.xml simpleJob"
Hopefully, your efforts will be rewarded with a "Hello World!" printed on the console.
The code source can be downloaded here.
source : http://springtips.blogspot.in/2008/06/spring-batch-hello-world.html
Step by step Spring-WS
Took a look at Spring-WS and came up with a quick example service to describe its use. I decided to build an 'echo' service. Send in a text and it will echo that back with a date and time appended to the text.
After building the application I saw that Spring-WS comes with a sample echo service application. Oh well. Since I put in the effort here is the article on it.
Spring-WS encourages document based web services. As you know there are mainly two types of web services:
In the document based approach you no longer think of operations (their parameters and return types). You decide on what XML document you want to send in as input and what XML document you want to return from your web service as a response.
When you think document based the traditional approach thus far has been to draw up the WSDL and then go from there. I see no problem in this approach.
Spring-WS encourages a more practical approach to designing document based web services. Rather than think WSDL, it pushes you to think XSD (or the document schema) and then Spring-WS can auto-generate the WSDL from the schema.
Lets break it up into simpler steps:
Lets see the echo service in action. You will notice that I do not create any WSDL document throughout this article.
Business Case:
Echo service takes in an XML request document and returns an XML document with a response. The response contains the text that was sent in, appended with a timestamp.
Request XML Sample: <ec:EchoRequest>
<ec::Echo>
<ec:Name>Mathew</ec:Name>
</ec:Echo>
</ec:EchoRequest>
The schema XSD file for this can be found in the WEB-INF folder of the application (echo.xsd).
Response XML Sample:
<ec:EchoResponse>
<ec:Message>echo back: name Mathew received on 05-06-2007 06:42:08 PM
</ec:Message>
</ec:EchoResponse>
The schema XSD file for this can be found in the WEB-INF folder of the application (echo.xsd).
If you inspect the SOAP request and response you will see that this XML is whats inside the SOAP body. Thats precisely what is document based web services.
Echo Service Implementation:
Here is the echo service Java interface and its related implementation. As you can see this is a simple POJO.
package echo.service;
public interface EchoService {
public String echo(java.lang.String name);
}
package echo.service;
import java.text.SimpleDateFormat;
import java.util.Calendar;
public class EchoServiceImpl implements EchoService {
public String echo(String name) {
if (name == null || name.trim().length() == 0) {
return "echo back: -please provide a name-";
}
SimpleDateFormat dtfmt = new SimpleDateFormat("MM-dd-yyyy hh:mm:ss a");
return "echo back: name " + name + " received on "
+ dtfmt.format(Calendar.getInstance().getTime());
}
}
Now the Spring-WS stuff:
Here is the web.xml for the sake of clarity.
<?xml version="1.0" encoding="UTF-8"?>
<web-app xmlns="http://java.sun.com/xml/ns/j2ee" xmlns:xsi="http://www.w3.org/2001/XMLSchema-instance"
xsi:schemaLocation="http://java.sun.com/xml/ns/j2ee">
<display-name>Echo Web Service Application</display-name>
<servlet>
<servlet-name>spring-ws</servlet-name>
<servlet-class>org.springframework.ws.transport.http.MessageDispatcherServlet</servlet-class>
</servlet>
<servlet-mapping>
<servlet-name>spring-ws</servlet-name>
<url-pattern>/*</url-pattern>
</servlet-mapping>
</web-app>
Only thing to note in the web.xml is the Spring-WS servlet.
Next is the all important Spring bean configuration XML.
<?xml version="1.0" encoding="UTF-8"?>
<beans xmlns="http://www.springframework.org/schema/beans"
xmlns:xsi="http://www.w3.org/2001/XMLSchema-instance"
xsi:schemaLocation="http://www.springframework.org/schema/beans">
<bean id="echoEndpoint" >
<property name="echoService"><ref bean="echoService"/></property>
</bean>
<bean id="echoService" />
<bean >
<property name="mappings">
<props>
<prop key="{http://www.averconsulting.com/echo/schemas}EchoRequest"
>echoEndpoint</prop>
</props>
</property>
<property name="interceptors">
<bean />
</property>
</bean>
<bean id="echo" >
<property name="builder">
<bean>
<property name="schema" value="/WEB-INF/echo.xsd"/>
<property name="portTypeName" value="Echo"/>
<property name="locationUri" value="http://localhost:9090/echoservice/"/>
</bean>
</property>
</bean>
</beans>
package echo.endpoint;
import org.jdom.Document;
import org.jdom.Element;
import org.jdom.Namespace;
import org.jdom.output.XMLOutputter;
import org.jdom.xpath.XPath;
import org.springframework.ws.server.endpoint.AbstractJDomPayloadEndpoint;
import echo.service.EchoService;
public class EchoEndpoint extends AbstractJDomPayloadEndpoint {
private EchoService echoService;
public void setEchoService(EchoService echoService) {
this.echoService = echoService;
}
protected Element invokeInternal(Element request) throws Exception {
// ok now we have the XML document from the web service request
// lets system.out the XML so we can see it on the console (log4j
// latter)
System.out.println("XML Doc >> ");
XMLOutputter xmlOutputter = new XMLOutputter();
xmlOutputter.output(request, System.out);
// I am using JDOM for my example....feel free to process the XML in
// whatever way you best deem right (jaxb, castor, sax, etc.)
// some jdom stuff to read the document
Namespace namespace = Namespace.getNamespace("ec",
"http://www.averconsulting.com/echo/schemas");
XPath nameExpression = XPath.newInstance("//ec:Name");
nameExpression.addNamespace(namespace);
// lets call a backend service to process the contents of the XML
// document
String name = nameExpression.valueOf(request);
String msg = echoService.echo(name);
// build the response XML with JDOM
Namespace echoNamespace = Namespace.getNamespace("ec",
"http://www.averconsulting.com/echo/schemas");
Element root = new Element("EchoResponse", echoNamespace);
Element echoResponse = new Element("EchoResponse", echoNamespace);
root.addContent(echoResponse);
Element message = new Element("Message", echoNamespace);
echoResponse.addContent(message);
message.setText(msg);
Document doc = new Document(root);
// return response XML
System.out.println();
System.out.println("XML Response Doc >> ");
xmlOutputter.output(doc, System.out);
return doc.getRootElement();
}
}
This is a simple class. Important point to note is that it extends 'AbstractJDomPayloadEndpoint'. The 'AbstractJDomPayloadEndpoint' class is a helper that gives you the XML payload as a JDom object. There are similar classes built for SAX, Stax and others. Most of the code above is reading the request XML using JDOM API and parsing the data out so that we may provide it to our echo service for consumption.
Finally I build a response XML document to return and thats it.
Download the sample Application:
Click here to download the jar file containing the application. The application is built using Maven. If you do not have Maven please install it. Once Maven is installed run the following commands:
While I could not find a roadmap for Spring-WS, depending on the features it starts supporting this could become a very suitable candidate for web service integration projects. Sure folks will say where is WS-Transactions and all of that, but tell me how many others implement that. I think if Spring-WS grows to support 90% of what folks need in integration projects then it will suffice. I hope in future I see some support for content transformation.
Spring 3 REST hello world example
In the last couple of years, REST has emerged as a compelling alternative to SOAP/WSDL/WS-*-based distributed architectures. So when we started to plan our work on the next major release of Spring – version 3.0, it was quite clear to us that we had to focus on making the development of 'RESTful' Web services and applications easier.
In Spring 3, old RequestMapping class is enhanced to support RESTful features, which makes Spring developers easier to develop REST services in Spring MVC.
In this tutorial, we show you how to use Spring 3 MVC annotations to develop a RESTful style web application.
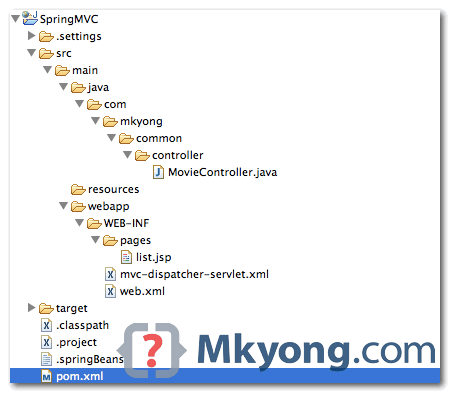
1. Project Directory
Review the project folder structure.
One of the speciality of spring framework is the options it provide for customization. In the last article we saw about spring bean scopes available as part of standard implementation. In this article we shall see about custom scope that is available from Spring 2.0
Based on spring custom scope, we can define new scope as well as modify out of the box provided spring bean scopes. We will not be able to modify the standard singleton and prototype scopes but we can modify the request, session and global_session scopes. Though spring framework provides option to modify the existing scopes, its better not to touch it and also I don’t see any real use case that asks for overriding existing scopes.
Example scenarios where we can use spring bean custom scope are in,
- creating a bean scope where beans can be shared between servlet contexts
- creating a bean scope where beans can be shared within a same thread
- and a lot more spring custom scope example
- out of all these, I like the idea of having a custom scope for a Locale
org.springframework.beans.factory.config.Scope is an interface and by implementing it we create a custom scope in the spring container. This Scope interface contains four methods,
- get(..) – this get method is to return the bean from the given scope
- remove(..) – this method is to remove an object from the scope
- registerDestructionCallback(..) – this method is a callback method and gets invoked when the object in this scope is destroyed
- getConversationId() – This depends on the scope and implementation. For example session scope it returns the sessionid
2. Register the created custom bean
Once we create the custom spring bean scope we need to register it with the spring container. There are two ways to do it. Either through programmatic registration or using conventional XML based configuration. For programmatic registration, we should get the bean factory and call the registerScope method as below,
Spring Batch
This is an introductory tutorial to Spring Batch. It does not aim to provide a complete guide to the framework but rather to facilitate the first contact. Spring Batch is quite rich in functionalities, and this is basically how I started learning it. Keep in mind that we will only be scratching the surface.
Before we start
All the examples will have the lofty task of printing "Hello World!" though in different ways. They were developed with Spring Batch 1.0. I'll provide a Maven 2 project and I'll run the examples with Maven but of course it is not a requirement to work with Spring Batch.
Spring Batch in 2 Words
Fortunately, Spring Batch model objects have self-explanatory names. Let's try to enumerate the most important and to link them together:
A batch Job is composed of one or more Steps. A JobInstance represents a given Job, parametrized with a set of typed properties called JobParameters. Each run of of a JobInstance is a JobExecution. Imagine a job reading entries from a data base and generating an xml representation of it and then doing some clean-up. We have a Job composed of 2 steps: reading/writing and clean-up. If we parametrize this job by the date of the generated data then our Friday the 13th job is a JobInstance. Each time we run this instance (if a failure occurs for instance) is a JobExecution. This model gives a great flexibility regarding how jobs are launched and run. This naturally brings us to launching jobs with their job parameters, which is the responsibility of JobLauncher. Finally, various objects in the framework require a JobRepository to store runtime information related to the batch execution. In fact, Spring Batch domain model is much more elaborate but this will suffice for our purpose.
Well, it took more than 2 words and I feel compelled to make a joke about it, but I won't. So let's move to the next section.
Common Objects
For each job, we will use a separate xml context definition file. However there is a number of common objects that we will need recurrently. I will group them in an applicationContext.xml which will be imported from within job definitions. Let's go through these common objects:
JobLauncher
JobLaunchers are responsible for starting a Job with a given job parameters. The provided implementation, SimpleJobLauncher, relies on a TaskExecutor to launch the jobs. If no specific TaskExecutor is set then a SyncTaskExecutor is used.
JobRepository
We will use the SimpleJobRepository implementation which requires a set of execution Daos to store its information.
JobInstanceDao, JobExecutionDao, StepExecutionDao
These data access objects are used by SimpleJobRepository to store execution related information. Two sets of implementations are provided by Spring Batch: Map based (in-memory) and Jdbc based. In a real application the Jdbc variants are more suitable but we will use the simpler in-memory alternative in this example.
Here's our applicationContext.xml:
01.<beans xmlns="http://www.springframework.org/schema/beans"
02.xmlns:xsi="http://www.w3.org/2001/XMLSchema-instance"
03.xsi:schemaLocation="http://www.springframework.org/schema/beans
04.http://www.springframework.org/schema/beans/spring-beans-2.5.xsd">
05.<bean id="jobLauncher" class="org.springframework.batch.core.launch.support.SimpleJobLauncher">
06.<property name="jobRepository" ref="jobRepository"/>07.</bean>
08.
09.<bean id="jobRepository" class="org.springframework.batch.core.repository.support.SimpleJobRepository">
10.<constructor-arg>
11.<bean class="org.springframework.batch.core.repository.dao.MapJobInstanceDao"/>
12.</constructor-arg>
13.<constructor-arg>
14.<bean class="org.springframework.batch.core.repository.dao.MapJobExecutionDao" />
15.</constructor-arg>
16.<constructor-arg>
17.<bean class="org.springframework.batch.core.repository.dao.MapStepExecutionDao"/>
18.</constructor-arg>
19.</bean>
20.
21.</beans>
Hello World with TaskletsA tasklet is an object containing any custom logic to be executed as a part of a job. Tasklets are built by implementing the Tasklet interface. Let's implement a simple tasklet that simply prints a message:
01.public class PrintTasklet implements Tasklet{
02.
03.private String message;
04.
05.public void setMessage(String message) {
06.this.message = message;
07.
}
08.
09.public ExitStatus execute() throws Exception {
10.System.out.print(message);
11.return ExitStatus.FINISHED;
12.}
13.}
Notice that the execute method returns an ExitStatus to indicate the status of the execution of the tasklet.
We will define our first job now in a simpleJob.xml application context. We will use the SimpleJob implementation which executes all of its steps sequentailly. In order to plug a tasklet into a job, we need a TaskletStep. I also added an abstract bean definition for tasklet steps in order to simplify the configuration:
01.<beans xmlns="http://www.springframework.org/schema/beans"
02.xmlns:xsi="http://www.w3.org/2001/XMLSchema-instance"
03.xsi:schemaLocation="http://www.springframework.org/schema/beans
04.http://www.springframework.org/schema/beans/spring-beans-2.5.xsd">
05.<import resource="applicationContext.xml"/>
06.
07.<bean id="hello" class="helloworld.PrintTasklet">
08.<property name="message" value="Hello"/>
09.</bean>
10.
11.<bean id="space" class="helloworld.PrintTasklet">
12.<property name="message" value=" "/>
13.</bean>
14.
15.<bean id="world" class="helloworld.PrintTasklet">
16.<property name="message" value="World!"/>
17.</bean>
18.
19.<bean id="taskletStep" abstract="true"
20.class="org.springframework.batch.core.step.tasklet.TaskletStep">
21.<property name="jobRepository" ref="jobRepository"/>
22.</bean>
23.
24.<bean id="simpleJob" class="org.springframework.batch.core.job.SimpleJob">
25.<property name="name" value="simpleJob" />
26.<property name="steps">
27.<list>
28.<bean parent="taskletStep">
29.<property name="tasklet" ref="hello"/>
30.</bean>
31.<bean parent="taskletStep">
32.<property name="tasklet" ref="space"/>
33.</bean>
34.<bean parent="taskletStep">;
35.<property name="tasklet" ref="world"/>
36.</bean>
37.</list>
38.</property>
39.<property name="jobRepository" ref="jobRepository"/>
40.</bean>
41.</beans>
Running the JobNow we need something to kick-start the execution of our jobs. Spring Batch provides a convenient class to achieve that from the command line: CommandLineJobRunner. In its simplest form this class takes 2 arguments: the xml application context containing the job to launch and the bean id of that job. It naturally requires a JobLauncher to be configured in the application context. Here's how to launch the job with Maven. Of course, it can be run with the java command directly (you need to specify the class path then):
mvn exec:java -Dexec.main.springframework.batch.core.launch.support.CommandLineJobRunner -Dexec.args="simpleJob.xml simpleJob"
Hopefully, your efforts will be rewarded with a "Hello World!" printed on the console.
The code source can be downloaded here.
source : http://springtips.blogspot.in/2008/06/spring-batch-hello-world.html
Step by step Spring-WS
Took a look at Spring-WS and came up with a quick example service to describe its use. I decided to build an 'echo' service. Send in a text and it will echo that back with a date and time appended to the text.
After building the application I saw that Spring-WS comes with a sample echo service application. Oh well. Since I put in the effort here is the article on it.
Spring-WS encourages document based web services. As you know there are mainly two types of web services:
- RPC based.
- Document based.
In the document based approach you no longer think of operations (their parameters and return types). You decide on what XML document you want to send in as input and what XML document you want to return from your web service as a response.
When you think document based the traditional approach thus far has been to draw up the WSDL and then go from there. I see no problem in this approach.
Spring-WS encourages a more practical approach to designing document based web services. Rather than think WSDL, it pushes you to think XSD (or the document schema) and then Spring-WS can auto-generate the WSDL from the schema.
Lets break it up into simpler steps:
- Create your XML schema (.xsd file). Inside the schema you will create your request messages and response messages. Bring up your favourite schema editor to create the schema or write sample request and response XML and then reverse-engineer the schema (check if your tool supports it).
- You have shifted the focus onto the document (or the XML). Now use Spring-WS to point to the XSD and set up a few Spring managed beans and soon you have the web service ready. No WSDL was ever written.
Lets see the echo service in action. You will notice that I do not create any WSDL document throughout this article.
Business Case:
Echo service takes in an XML request document and returns an XML document with a response. The response contains the text that was sent in, appended with a timestamp.
Request XML Sample: <ec:EchoRequest>
<ec::Echo>
<ec:Name>Mathew</ec:Name>
</ec:Echo>
</ec:EchoRequest>
The schema XSD file for this can be found in the WEB-INF folder of the application (echo.xsd).
Response XML Sample:
<ec:EchoResponse>
<ec:Message>echo back: name Mathew received on 05-06-2007 06:42:08 PM
</ec:Message>
</ec:EchoResponse>
The schema XSD file for this can be found in the WEB-INF folder of the application (echo.xsd).
If you inspect the SOAP request and response you will see that this XML is whats inside the SOAP body. Thats precisely what is document based web services.
Echo Service Implementation:
Here is the echo service Java interface and its related implementation. As you can see this is a simple POJO.
package echo.service;
public interface EchoService {
public String echo(java.lang.String name);
}
package echo.service;
import java.text.SimpleDateFormat;
import java.util.Calendar;
public class EchoServiceImpl implements EchoService {
public String echo(String name) {
if (name == null || name.trim().length() == 0) {
return "echo back: -please provide a name-";
}
SimpleDateFormat dtfmt = new SimpleDateFormat("MM-dd-yyyy hh:mm:ss a");
return "echo back: name " + name + " received on "
+ dtfmt.format(Calendar.getInstance().getTime());
}
}
Now the Spring-WS stuff:
Here is the web.xml for the sake of clarity.
<?xml version="1.0" encoding="UTF-8"?>
<web-app xmlns="http://java.sun.com/xml/ns/j2ee" xmlns:xsi="http://www.w3.org/2001/XMLSchema-instance"
xsi:schemaLocation="http://java.sun.com/xml/ns/j2ee">
<display-name>Echo Web Service Application</display-name>
<servlet>
<servlet-name>spring-ws</servlet-name>
<servlet-class>org.springframework.ws.transport.http.MessageDispatcherServlet</servlet-class>
</servlet>
<servlet-mapping>
<servlet-name>spring-ws</servlet-name>
<url-pattern>/*</url-pattern>
</servlet-mapping>
</web-app>
Only thing to note in the web.xml is the Spring-WS servlet.
Next is the all important Spring bean configuration XML.
<?xml version="1.0" encoding="UTF-8"?>
<beans xmlns="http://www.springframework.org/schema/beans"
xmlns:xsi="http://www.w3.org/2001/XMLSchema-instance"
xsi:schemaLocation="http://www.springframework.org/schema/beans">
<bean id="echoEndpoint" >
<property name="echoService"><ref bean="echoService"/></property>
</bean>
<bean id="echoService" />
<bean >
<property name="mappings">
<props>
<prop key="{http://www.averconsulting.com/echo/schemas}EchoRequest"
>echoEndpoint</prop>
</props>
</property>
<property name="interceptors">
<bean />
</property>
</bean>
<bean id="echo" >
<property name="builder">
<bean>
<property name="schema" value="/WEB-INF/echo.xsd"/>
<property name="portTypeName" value="Echo"/>
<property name="locationUri" value="http://localhost:9090/echoservice/"/>
</bean>
</property>
</bean>
</beans>
- Registered the 'echoService' implementation bean.
- Registered an endpoint class named 'echoEndpoint'. The endpoint is the class that receives the incoming web service request.
- The endpoint receives the XML document. You parse the XML data and then call our echo service implementation bean.
- The bean 'PayloadRootQNameEndpointMapping' is what maps the incoming request to the endpoint class. Here we set up one mapping. Anytime we see a 'EchoRequest' tag with the specified namespace we direct it to our endpoint class.
- The 'XsdBasedSoap11Wsdl4jDefinitionBuilder' class is what does the magic of converting the schema XSD to a WSDL document for outside consumption. Based on simple naming conventions in the schema (like XXRequest and XXResponse) the bean can generate a WSDL. This rounds up the 'thinking in XSD for document web services' implementation approach. Once deployed the WSDL is available at http://localhost:9090/echoservice/echo.wsdl.
package echo.endpoint;
import org.jdom.Document;
import org.jdom.Element;
import org.jdom.Namespace;
import org.jdom.output.XMLOutputter;
import org.jdom.xpath.XPath;
import org.springframework.ws.server.endpoint.AbstractJDomPayloadEndpoint;
import echo.service.EchoService;
public class EchoEndpoint extends AbstractJDomPayloadEndpoint {
private EchoService echoService;
public void setEchoService(EchoService echoService) {
this.echoService = echoService;
}
protected Element invokeInternal(Element request) throws Exception {
// ok now we have the XML document from the web service request
// lets system.out the XML so we can see it on the console (log4j
// latter)
System.out.println("XML Doc >> ");
XMLOutputter xmlOutputter = new XMLOutputter();
xmlOutputter.output(request, System.out);
// I am using JDOM for my example....feel free to process the XML in
// whatever way you best deem right (jaxb, castor, sax, etc.)
// some jdom stuff to read the document
Namespace namespace = Namespace.getNamespace("ec",
"http://www.averconsulting.com/echo/schemas");
XPath nameExpression = XPath.newInstance("//ec:Name");
nameExpression.addNamespace(namespace);
// lets call a backend service to process the contents of the XML
// document
String name = nameExpression.valueOf(request);
String msg = echoService.echo(name);
// build the response XML with JDOM
Namespace echoNamespace = Namespace.getNamespace("ec",
"http://www.averconsulting.com/echo/schemas");
Element root = new Element("EchoResponse", echoNamespace);
Element echoResponse = new Element("EchoResponse", echoNamespace);
root.addContent(echoResponse);
Element message = new Element("Message", echoNamespace);
echoResponse.addContent(message);
message.setText(msg);
Document doc = new Document(root);
// return response XML
System.out.println();
System.out.println("XML Response Doc >> ");
xmlOutputter.output(doc, System.out);
return doc.getRootElement();
}
}
This is a simple class. Important point to note is that it extends 'AbstractJDomPayloadEndpoint'. The 'AbstractJDomPayloadEndpoint' class is a helper that gives you the XML payload as a JDom object. There are similar classes built for SAX, Stax and others. Most of the code above is reading the request XML using JDOM API and parsing the data out so that we may provide it to our echo service for consumption.
Finally I build a response XML document to return and thats it.
Download the sample Application:
Click here to download the jar file containing the application. The application is built using Maven. If you do not have Maven please install it. Once Maven is installed run the following commands:
- mvn package (this will generate the web service war file in the target folder).
- mvn jetty:run (this will bring up Jetty and you can access the wsdl at http://localhost:9090/echoservice/echo.wsdl.
- Finally use some web service accessing tool like the eclipse plug-in soapUI to invoke the web service.
While I could not find a roadmap for Spring-WS, depending on the features it starts supporting this could become a very suitable candidate for web service integration projects. Sure folks will say where is WS-Transactions and all of that, but tell me how many others implement that. I think if Spring-WS grows to support 90% of what folks need in integration projects then it will suffice. I hope in future I see some support for content transformation.
Spring 3 REST hello world example
In the last couple of years, REST has emerged as a compelling alternative to SOAP/WSDL/WS-*-based distributed architectures. So when we started to plan our work on the next major release of Spring – version 3.0, it was quite clear to us that we had to focus on making the development of 'RESTful' Web services and applications easier.
In Spring 3, old RequestMapping class is enhanced to support RESTful features, which makes Spring developers easier to develop REST services in Spring MVC.
In this tutorial, we show you how to use Spring 3 MVC annotations to develop a RESTful style web application.
1. Project Directory
Review the project folder structure.
2. Project Dependency
To develop REST in Spring MVC, just include the core Spring and Spring MVC dependencies.
pom.xml
<properties>
<spring.version>3.0.5.RELEASE</spring.version>
</properties>
<dependencies>
<!-- Spring 3 dependencies -->
<dependency>
<groupId>
org.springframework
</groupId>
<artifactId>spring-core</artifactId>
<version>${spring.version}</version> </dependency>
<dependency>
<groupId>org.springframework</groupId>
<artifactId>spring-web</artifactId>
<version>${spring.version}</version>
</dependency>
<dependency>
<groupId>org.springframework</groupId>
<artifactId>spring-webmvc</artifactId>
<version>${spring.version}</version>
</dependency>
</dependencies>
</project>
3. REST Controller
URI Templates
A URI template is a URI-like string, containing one or more variable names. When these variables are substituted for values, the template becomes a URI. For more information, see the proposed RFC.
In Spring 3.0 M1, introduced the use of URI templates through the @PathVariable annotation. For instance:
@RequestMapping(value = "/{name}", method = RequestMethod.GET)
public String getMovie(@PathVariable String name, ModelMap model)
{
model.addAttribute("movie", name);
return "list";
}
When a request comes in for /movie/1, that 1 will be bound to the movieId parameter. You can optionally specify the variable name the parameter is bound to, but when you compile your code with debugging enabled that is not necessary: we infer the path variable name from the parameter name.
You can also have more than one path variable, like so:
@RequestMapping(value = "/movie/{name}/bookings/{booking}", method = RequestMethod.GET)
public String getBooking(@PathVariable("movie") long movieId, @PathVariable("booking") long bookingId, Model model)
{
Movie movie =movieService.getMovie(movieId);
Booking booking = movie.getBooking(bookingId);
model.addAttribute("booking", booking);
return "list";
}
This would match requests like /movie/1/bookings/2, for instance.
Content Negotiation
In version 2.5, Spring-MVC lets the @Controller decide which view to render for a given request, through its View, view name, and ViewResolver abstractions. In a RESTful scenario, it is common to let the client decide the acceptable representations, via the Accept HTTP header. The server responds with the delivered representation via the Content-Type header. This process is known as content negotiation.
One issue with the Accept header is that is impossible to change it in a web browser, in HTML. For instance, in Firefox, it's fixed to
Accept: text/html,application/xhtml+xml,application/xml;q=0.9,*/*;q=0.8
So what if you want to link to a PDF version of a particular resource? Looking at the file extension is a good workaround. For example, http://example.com/movies.pdf retrieves the PDF view of the movie list, as does http://example.com/movies with an Accept header of application/pdf.
This is what the ContentNegotiatingViewResolver does: it wraps one or more other ViewResolvers, looks at the Accept header or file extension, and resolves a view corresponding to these.
Views
We also added some new Views to Spring MVC, particularly:
HTTP Method Conversion
Another key principle of REST is the use of the Uniform Interface. Basically, this means that all resources (URLs) can be manipulated using the same four HTTP method: GET, PUT, POST, and DELETE. For each of methods, the HTTP specification defines exact semantics. For instance, a GET should always be a safe operation, meaning that is has no side effects, and a PUT or DELETE should be idempotent, meaning that you can repeat these operations over and over again, but the end result should be the same.
While HTTP defines these four methods, HTML only supports two: GET and POST. Fortunately, there are two possible workarounds: you can either use JavaScript to do your PUT or DELETE, or simply do a POST with the 'real' method as an additional parameter (modeled as a hidden input field in an HTML form). This latter trick is what the HiddenHttpMethodFilter does. This filter was introduced in Spring 3.0 M1, and is a plain Servlet Filter. As such, it can be used in combination with any web framework (not just Spring MVC). Simply add this filter to your web.xml, and a POST with a hidden _method parameter will be converted into the corresponding HTTP method request.
As an extra bonus, we've also added support for method conversion in the Spring MVC form tags. For example, the following snippet taken from the updated Petclinic sample:
<form:form method="delete">
<p class="submit">
<input type="submit" value="Delete Pet"/>
</p>
</form:form>
will actually perform an HTTP POST, with the 'real' DELETE method hidden behind a request parameter, to be picked up by the HiddenHttpMethodFilter. The corresponding @Controller method is therefore:
@RequestMapping(method = RequestMethod.DELETE)
public String deletePet(@PathVariable int ownerId, @PathVariable int petId) {
this.clinic.deletePet(petId);
return "redirect:/owners/" + ownerId;
}
ETag support
An ETag (entity tag) is an HTTP response header returned by an HTTP/1.1 compliant web server used to determine change in content at a given URL. It can be considered to be the more sophisticated successor to the Last-Modified header. When a server returns a representation with an ETag header, client can use this header in subsequent GETs, in a If-None-Match header. If the content has not changed, the server will return 304: Not Modified.
In Spring 3.0 M1, we introduced the ShallowEtagHeaderFilter. This is a plain Servlet Filter, and thus can be used in combination any web framework. As the name indicates, the filter creates so-called shallow ETags (as opposed to a deep ETags, more about that later). The way it works is quite simple: the filter simply caches the content of the rendered JSP (or other content), generates a MD5 hash over that, and returns that as a ETag header in the response. The next time a client sends a request for the same resource, it use that hash as the If-None-Match value. The filter notices this, renders the view again, and compares the two hashes. If they are equal, a 304 is returned. It is important to note that this filter will not save processing power, as the view is still rendered. The only thing it saves is bandwith, as the rendered response is not sent back over the wire.
Deep ETags are a bit more complicated. In this case, the ETag is based on the underlying domain objects, RDMBS tables, etc. Using this approach, no content is generated unless the underlying data has changed. Unfortunately, implementing this approach in a generic way is much more difficult than shallow ETags. We might add support for deep ETags in a later version of Spring, by relying on JPA's @Version annotation, or an AspectJ aspect for instance.
For Spring RESTful, you need PathVariable, RequestMapping and RequestMethod. Following code should be self-explanatory.
MovieController.java
package com.mkyong.common.controller;
import org.springframework.stereotype.Controller;
import org.springframework.ui.ModelMap;
import org.springframework.web.bind.annotation.PathVariable;
import org.springframework.web.bind.annotation.RequestMapping;
import org.springframework.web.bind.annotation.RequestMethod;
@Controller
@RequestMapping("/movie")
public class MovieController {
@RequestMapping(value = "/{name}", method = RequestMethod.GET)
public String getMovie(@PathVariable String name, ModelMap model)
{
model.addAttribute("movie", name);
return "list";
}
@RequestMapping(value = "/", method = RequestMethod.GET)
public String getDefaultMovie(ModelMap model)
{
model.addAttribute("movie", "this is default movie"); return "list"; }
}
4. JSP Views
A JSP page to display the value.
list.jsp
<html>
<body>
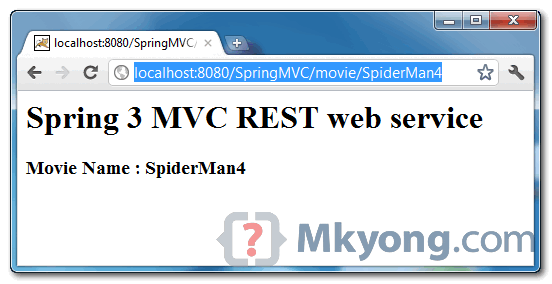
<h1>Spring 3 MVC REST web service</h1>
<h2>Movie Name : ${movie}</h2>
</body>
</html>
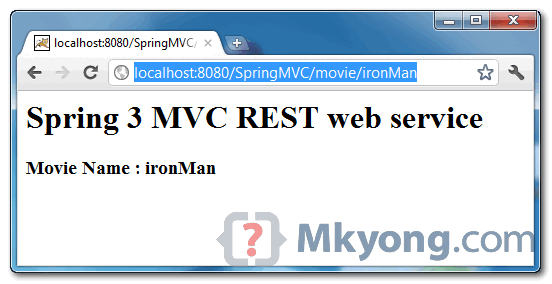
5. Demo
See REST URLs demonstration.
URL : http://localhost:8080/SpringMVC/movie/ironMan
To develop REST in Spring MVC, just include the core Spring and Spring MVC dependencies.
pom.xml
<properties>
<spring.version>3.0.5.RELEASE</spring.version>
</properties>
<dependencies>
<!-- Spring 3 dependencies -->
<dependency>
<groupId>
org.springframework
</groupId>
<artifactId>spring-core</artifactId>
<version>${spring.version}</version> </dependency>
<dependency>
<groupId>org.springframework</groupId>
<artifactId>spring-web</artifactId>
<version>${spring.version}</version>
</dependency>
<dependency>
<groupId>org.springframework</groupId>
<artifactId>spring-webmvc</artifactId>
<version>${spring.version}</version>
</dependency>
</dependencies>
</project>
3. REST Controller
URI Templates
A URI template is a URI-like string, containing one or more variable names. When these variables are substituted for values, the template becomes a URI. For more information, see the proposed RFC.
In Spring 3.0 M1, introduced the use of URI templates through the @PathVariable annotation. For instance:
@RequestMapping(value = "/{name}", method = RequestMethod.GET)
public String getMovie(@PathVariable String name, ModelMap model)
{
model.addAttribute("movie", name);
return "list";
}
When a request comes in for /movie/1, that 1 will be bound to the movieId parameter. You can optionally specify the variable name the parameter is bound to, but when you compile your code with debugging enabled that is not necessary: we infer the path variable name from the parameter name.
You can also have more than one path variable, like so:
@RequestMapping(value = "/movie/{name}/bookings/{booking}", method = RequestMethod.GET)
public String getBooking(@PathVariable("movie") long movieId, @PathVariable("booking") long bookingId, Model model)
{
Movie movie =movieService.getMovie(movieId);
Booking booking = movie.getBooking(bookingId);
model.addAttribute("booking", booking);
return "list";
}
This would match requests like /movie/1/bookings/2, for instance.
Content Negotiation
In version 2.5, Spring-MVC lets the @Controller decide which view to render for a given request, through its View, view name, and ViewResolver abstractions. In a RESTful scenario, it is common to let the client decide the acceptable representations, via the Accept HTTP header. The server responds with the delivered representation via the Content-Type header. This process is known as content negotiation.
One issue with the Accept header is that is impossible to change it in a web browser, in HTML. For instance, in Firefox, it's fixed to
Accept: text/html,application/xhtml+xml,application/xml;q=0.9,*/*;q=0.8
So what if you want to link to a PDF version of a particular resource? Looking at the file extension is a good workaround. For example, http://example.com/movies.pdf retrieves the PDF view of the movie list, as does http://example.com/movies with an Accept header of application/pdf.
This is what the ContentNegotiatingViewResolver does: it wraps one or more other ViewResolvers, looks at the Accept header or file extension, and resolves a view corresponding to these.
Views
We also added some new Views to Spring MVC, particularly:
- the AbstractAtomFeedView and AbstractRssFeedView, which can be used to return an Atom and RSS feed,
- the MarshallingView, which can be used to return an XML representation. This view is based on the Object/XML Mapping module, which has been copied from the Spring Web Services project. This module wraps XML marshalling technologies such as JAXB, Castor, JiBX, and more, and makes it easier to configure these within a Spring application context,
- the JacksonJsonView, for JSON representations of objects in your model. This view is actually part of the Spring JavaScript project, which we'll talk about more in a future blog post.
HTTP Method Conversion
Another key principle of REST is the use of the Uniform Interface. Basically, this means that all resources (URLs) can be manipulated using the same four HTTP method: GET, PUT, POST, and DELETE. For each of methods, the HTTP specification defines exact semantics. For instance, a GET should always be a safe operation, meaning that is has no side effects, and a PUT or DELETE should be idempotent, meaning that you can repeat these operations over and over again, but the end result should be the same.
While HTTP defines these four methods, HTML only supports two: GET and POST. Fortunately, there are two possible workarounds: you can either use JavaScript to do your PUT or DELETE, or simply do a POST with the 'real' method as an additional parameter (modeled as a hidden input field in an HTML form). This latter trick is what the HiddenHttpMethodFilter does. This filter was introduced in Spring 3.0 M1, and is a plain Servlet Filter. As such, it can be used in combination with any web framework (not just Spring MVC). Simply add this filter to your web.xml, and a POST with a hidden _method parameter will be converted into the corresponding HTTP method request.
As an extra bonus, we've also added support for method conversion in the Spring MVC form tags. For example, the following snippet taken from the updated Petclinic sample:
<form:form method="delete">
<p class="submit">
<input type="submit" value="Delete Pet"/>
</p>
</form:form>
will actually perform an HTTP POST, with the 'real' DELETE method hidden behind a request parameter, to be picked up by the HiddenHttpMethodFilter. The corresponding @Controller method is therefore:
@RequestMapping(method = RequestMethod.DELETE)
public String deletePet(@PathVariable int ownerId, @PathVariable int petId) {
this.clinic.deletePet(petId);
return "redirect:/owners/" + ownerId;
}
ETag support
An ETag (entity tag) is an HTTP response header returned by an HTTP/1.1 compliant web server used to determine change in content at a given URL. It can be considered to be the more sophisticated successor to the Last-Modified header. When a server returns a representation with an ETag header, client can use this header in subsequent GETs, in a If-None-Match header. If the content has not changed, the server will return 304: Not Modified.
In Spring 3.0 M1, we introduced the ShallowEtagHeaderFilter. This is a plain Servlet Filter, and thus can be used in combination any web framework. As the name indicates, the filter creates so-called shallow ETags (as opposed to a deep ETags, more about that later). The way it works is quite simple: the filter simply caches the content of the rendered JSP (or other content), generates a MD5 hash over that, and returns that as a ETag header in the response. The next time a client sends a request for the same resource, it use that hash as the If-None-Match value. The filter notices this, renders the view again, and compares the two hashes. If they are equal, a 304 is returned. It is important to note that this filter will not save processing power, as the view is still rendered. The only thing it saves is bandwith, as the rendered response is not sent back over the wire.
Deep ETags are a bit more complicated. In this case, the ETag is based on the underlying domain objects, RDMBS tables, etc. Using this approach, no content is generated unless the underlying data has changed. Unfortunately, implementing this approach in a generic way is much more difficult than shallow ETags. We might add support for deep ETags in a later version of Spring, by relying on JPA's @Version annotation, or an AspectJ aspect for instance.
For Spring RESTful, you need PathVariable, RequestMapping and RequestMethod. Following code should be self-explanatory.
MovieController.java
package com.mkyong.common.controller;
import org.springframework.stereotype.Controller;
import org.springframework.ui.ModelMap;
import org.springframework.web.bind.annotation.PathVariable;
import org.springframework.web.bind.annotation.RequestMapping;
import org.springframework.web.bind.annotation.RequestMethod;
@Controller
@RequestMapping("/movie")
public class MovieController {
@RequestMapping(value = "/{name}", method = RequestMethod.GET)
public String getMovie(@PathVariable String name, ModelMap model)
{
model.addAttribute("movie", name);
return "list";
}
@RequestMapping(value = "/", method = RequestMethod.GET)
public String getDefaultMovie(ModelMap model)
{
model.addAttribute("movie", "this is default movie"); return "list"; }
}
4. JSP Views
A JSP page to display the value.
list.jsp
<html>
<body>
<h1>Spring 3 MVC REST web service</h1>
<h2>Movie Name : ${movie}</h2>
</body>
</html>
5. Demo
See REST URLs demonstration.
URL : http://localhost:8080/SpringMVC/movie/ironMan
URL : http://localhost:8080/SpringMVC/movie/SpiderMan4
REST in Spring 3: RestTemplate
RestTemplate
The RestTemplate is the central Spring class for client-side HTTP access. Conceptually, it is very similar to the JdbcTemplate, JmsTemplate, and the various other templates found in the Spring Framework and other portfolio projects. This means, for instance, that the RestTemplate is thread-safe once constructed, and that you can use callbacks to customize its operations.
RestTemplate Methods
The main entry points of the template are named after the six main HTTP methods:
HTTP RestTemplate
DELETE delete(String, String...)
GET getForObject(String, Class, String...)
HEAD headForHeaders(String, String...)
OPTIONS optionsForAllow(String, String...)
POST postForLocation(String, Object, String...)
PUT put(String, Object, String...)
The names of these methods clearly indicate which HTTP method they invoke, while the second part of the name indicates what is returned. For instance, getForObject() will perform a GET, convert the HTTP response into an object type of your choice, and returns that object. postForLocation will do a POST, converting the given object into a HTTP request, and returns the response HTTP Location header where the newly created object can be found. As you can see, these methods try to enforce REST best practices.
URI Templates
Each of these methods takes a URI as first argument. That URI can be a URI template, and variables can be used to expand the template to a normal URI. The template variables can be passed in two forms: as a String variable arguments array, or as a Map. The string varargs variant expands the given template variables in order, so that
String result = restTemplate.getForObject("http://example.com/hotels/{hotel}/bookings/{booking}", String.class, "42", "21");
will perform a GET on http://example.com/hotels/42/bookings/21. The map variant expands the template based on variable name, and is therefore more useful when using many variables, or when a single variable is used multiple times. For example:
Map<String, String> vars = new HashMap<String, String>();
vars.put("hotel", "42");vars.put("booking", "21");
String result = restTemplate.getForObject("http://example.com/hotels/{hotel}/bookings/{booking}", String.class, vars);
will also perform a GET on http://example.com/hotels/42/rooms/42.
HttpMessageConverters
Objects passed to and returned from the methods getForObject(), postForLocation(), and put() and are converted to HTTP requests and from HTTP responses by HttpMessageConverters. Converters for the main mime types and Java types are registered by default, but you can also write your own converter and plug it in the RestTemplate. In the example below, I will show you how that's done.
Using the RestTemplate to retrieve photos from Flickr
Rather than going through the various methods of the RestTemplate, I will show you how to use it for retrieving pictures from Flickr, Yahoo!s online photo-sharing application. This sample application searches Flickr for photos that match a given search term. It then shows these pictures using a simple Swing UI. To run the application yourself, you will need to create a Flickr account and apply for an API key.
Searching for photos
Flickr exposes various APIs to manipulate its vast library of photos. The flickr.photos.search method allows you to search for photos, by issuing a GET request on http://www.flickr.com/services/rest?method=flickr.photos.search&api+key=xxx&tags=penguins, where you enter your API key and the thing to search for (penguins in this case). As a result, you get back a XML document, describing the photos that conform to your query. Something like:
<photos page="2" pages="89" perpage="10" total="881">
<photo id="2636" owner="47058503995@N01" secret="a123456" server="2" title="test_04" ispublic="1" isfriend="0" isfamily="0" />
<photo id="2635" owner="47058503995@N01" secret="b123456" server="2" title="test_03" ispublic="0" isfriend="1" isfamily="1" />
<photo id="2633" owner="47058503995@N01" secret="c123456" server="2" title="test_01" ispublic="1" isfriend="0" isfamily="0" />
<photo id="2610" owner="12037949754@N01" secret="d123456" server="2" title="00_tall"
ispublic="1" isfriend="0" isfamily="0" />
</photos>
Using the RestTemplate, retrieving such a document is quite trivial:
final String photoSearchUrl = "http://www.flickr.com/services/rest?method=flickr.photos.search&api+key={api-key}&tags={tag}&per_page=10";
Source photos = restTemplate.getForObject(photoSearchUrl, Source.class, apiKey, searchTerm);
where apiKey and searchTerm are two Strings given on the command line. This method uses the SourceHttpMessageConverter to convert the HTTP XML response into a javax.xml.transform.Source (Note that the SourceHttpMessageConverter was introduced shortly after we released Spring 3.0 M2, so you will have to get a recent snapshot (or the upcoming M3) to use it. The sample project available below is set up to retrieve these via Maven).
Retrieving the photos
Next, we're going to use an XPath expression to retrieve all the photo elements of the document. For this, we are going to use the XPathTemplate from Spring Web Services. We are going to execute the //photo expressions, returning all photo elements occurring anywhere in the document. The NodeMapper is a callback interface, whose mapNode() method will be invoked for each photo element in the document. In this case, we are retrieving the server, id, and secret attributes of this element, and use those to fill up a Map. Finally, we use the RestTemplate again, to retrieve the photo as a java.awt.image.BufferedImage. Thus when the XPath evaluation is done, the resulting imageList will contain an image for each photo in the XML document.
List<BufferedImage> imageList = xpathTemplate.evaluate("//photo", photos, new NodeMapper() {
public Object mapNode(Node node, int i) throws DOMException {
Element photo = (Element) node;
Map<String, String> variables = new HashMap<String, String>(3);
variables.put("server", photo.getAttribute("server"));
variables.put("id", photo.getAttribute("id"));
variables.put("secret", photo.getAttribute("secret"));
String photoUrl = "http://static.flickr.com/{server}/{id}_{secret}_m.jpg";
return restTemplate.getForObject(photoUrl, BufferedImage.class, variables);
}
});
For instance, given the XML document given above, the imageList will contain 4 images. The URL for the first image retrieved will be http://static.flickr.com/2/2636_ a123456_m.jpg, the second is http://static.flickr.com/2/2635_ b123456_m.jpg, etc.
Converting the images
There is one more thing that needs to be done in order for the code to work: we will need to write a HttpMessageConverter that is able to read from the HTTP response, and create a BufferedImagefrom that. Doing so with the Java Image I/O API is fairly simple, we just need to implement the read() method defined in the HttpMessageConverter interface. Overall, our simple converter looks like this:
public class BufferedImageHttpMessageConverter implements HttpMessageConverter<BufferedImage> {
public List<MediaType> getSupportedMediaTypes() {
return Collections.singletonList(new MediaType("image", "jpeg"));
}
public boolean supports(Class<? extends BufferedImage> clazz) {
return BufferedImage.class.equals(clazz);
}
public BufferedImage read(Class<BufferedImage> clazz, HttpInputMessage inputMessage) throws IOException {
return ImageIO.read(inputMessage.getBody());
}
public void write(BufferedImage image, HttpOutputMessage message) throws IOException {
throw new UnsupportedOperationException("Not implemented");
}
}
Note that we didn't implement write() because we are not uploading images, just downloading them. Now we just have to plug this converter into the RestTemplate. We do that in the Spring application context:
<beans xmlns="http://www.springframework.org/schema/beans"
xmlns:xsi="http://www.w3.org/2001/XMLSchema-instance"
xsi:schemaLocation="http://www.springframework.org/schema/beans http://www.springframework.org/schema/beans/spring-beans.xsd">
<bean id="flickrClient" class="com.springsource.samples.resttemplate.FlickrClient">
<constructor-arg ref="restTemplate"/>
<constructor-arg ref="xpathTemplate"/>
</bean>
<bean id="restTemplate" class="org.springframework.web.client.RestTemplate">
<property name="messageConverters">
<list>
<bean class="org.springframework.http.converter.xml.SourceHttpMessageConverter"/>
<bean class="com.springsource.samples.resttemplate.BufferedImageHttpMessageConverter"/>
</list>
</property>
</bean>
<bean id="xpathTemplate" class="org.springframework.xml.xpath.Jaxp13XPathTemplate"/>
</beans>
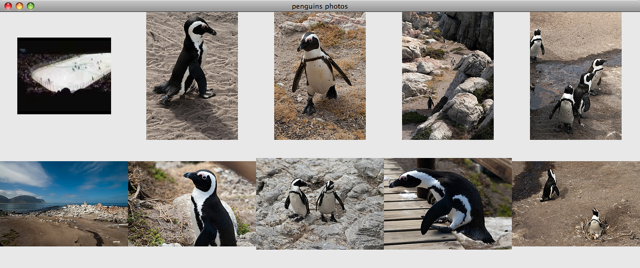
Showing the photos
The final stage is to show the photos in a simple GUI. For this, we use Swing:
JFrame frame = new JFrame(searchTerm + " photos");
frame.setLayout(new GridLayout(2, imageList.size() / 2));
for (BufferedImage image : imageList) {
frame.add(new JLabel(new ImageIcon(image)));}
frame.setDefaultCloseOperation(JFrame.EXIT_ON_CLOSE);
frame.pack();frame.setVisible(true);
which gives us the following:
RestTemplate
The RestTemplate is the central Spring class for client-side HTTP access. Conceptually, it is very similar to the JdbcTemplate, JmsTemplate, and the various other templates found in the Spring Framework and other portfolio projects. This means, for instance, that the RestTemplate is thread-safe once constructed, and that you can use callbacks to customize its operations.
RestTemplate Methods
The main entry points of the template are named after the six main HTTP methods:
HTTP RestTemplate
DELETE delete(String, String...)
GET getForObject(String, Class, String...)
HEAD headForHeaders(String, String...)
OPTIONS optionsForAllow(String, String...)
POST postForLocation(String, Object, String...)
PUT put(String, Object, String...)
The names of these methods clearly indicate which HTTP method they invoke, while the second part of the name indicates what is returned. For instance, getForObject() will perform a GET, convert the HTTP response into an object type of your choice, and returns that object. postForLocation will do a POST, converting the given object into a HTTP request, and returns the response HTTP Location header where the newly created object can be found. As you can see, these methods try to enforce REST best practices.
URI Templates
Each of these methods takes a URI as first argument. That URI can be a URI template, and variables can be used to expand the template to a normal URI. The template variables can be passed in two forms: as a String variable arguments array, or as a Map. The string varargs variant expands the given template variables in order, so that
String result = restTemplate.getForObject("http://example.com/hotels/{hotel}/bookings/{booking}", String.class, "42", "21");
will perform a GET on http://example.com/hotels/42/bookings/21. The map variant expands the template based on variable name, and is therefore more useful when using many variables, or when a single variable is used multiple times. For example:
Map<String, String> vars = new HashMap<String, String>();
vars.put("hotel", "42");vars.put("booking", "21");
String result = restTemplate.getForObject("http://example.com/hotels/{hotel}/bookings/{booking}", String.class, vars);
will also perform a GET on http://example.com/hotels/42/rooms/42.
HttpMessageConverters
Objects passed to and returned from the methods getForObject(), postForLocation(), and put() and are converted to HTTP requests and from HTTP responses by HttpMessageConverters. Converters for the main mime types and Java types are registered by default, but you can also write your own converter and plug it in the RestTemplate. In the example below, I will show you how that's done.
Using the RestTemplate to retrieve photos from Flickr
Rather than going through the various methods of the RestTemplate, I will show you how to use it for retrieving pictures from Flickr, Yahoo!s online photo-sharing application. This sample application searches Flickr for photos that match a given search term. It then shows these pictures using a simple Swing UI. To run the application yourself, you will need to create a Flickr account and apply for an API key.
Searching for photos
Flickr exposes various APIs to manipulate its vast library of photos. The flickr.photos.search method allows you to search for photos, by issuing a GET request on http://www.flickr.com/services/rest?method=flickr.photos.search&api+key=xxx&tags=penguins, where you enter your API key and the thing to search for (penguins in this case). As a result, you get back a XML document, describing the photos that conform to your query. Something like:
<photos page="2" pages="89" perpage="10" total="881">
<photo id="2636" owner="47058503995@N01" secret="a123456" server="2" title="test_04" ispublic="1" isfriend="0" isfamily="0" />
<photo id="2635" owner="47058503995@N01" secret="b123456" server="2" title="test_03" ispublic="0" isfriend="1" isfamily="1" />
<photo id="2633" owner="47058503995@N01" secret="c123456" server="2" title="test_01" ispublic="1" isfriend="0" isfamily="0" />
<photo id="2610" owner="12037949754@N01" secret="d123456" server="2" title="00_tall"
ispublic="1" isfriend="0" isfamily="0" />
</photos>
Using the RestTemplate, retrieving such a document is quite trivial:
final String photoSearchUrl = "http://www.flickr.com/services/rest?method=flickr.photos.search&api+key={api-key}&tags={tag}&per_page=10";
Source photos = restTemplate.getForObject(photoSearchUrl, Source.class, apiKey, searchTerm);
where apiKey and searchTerm are two Strings given on the command line. This method uses the SourceHttpMessageConverter to convert the HTTP XML response into a javax.xml.transform.Source (Note that the SourceHttpMessageConverter was introduced shortly after we released Spring 3.0 M2, so you will have to get a recent snapshot (or the upcoming M3) to use it. The sample project available below is set up to retrieve these via Maven).
Retrieving the photos
Next, we're going to use an XPath expression to retrieve all the photo elements of the document. For this, we are going to use the XPathTemplate from Spring Web Services. We are going to execute the //photo expressions, returning all photo elements occurring anywhere in the document. The NodeMapper is a callback interface, whose mapNode() method will be invoked for each photo element in the document. In this case, we are retrieving the server, id, and secret attributes of this element, and use those to fill up a Map. Finally, we use the RestTemplate again, to retrieve the photo as a java.awt.image.BufferedImage. Thus when the XPath evaluation is done, the resulting imageList will contain an image for each photo in the XML document.
List<BufferedImage> imageList = xpathTemplate.evaluate("//photo", photos, new NodeMapper() {
public Object mapNode(Node node, int i) throws DOMException {
Element photo = (Element) node;
Map<String, String> variables = new HashMap<String, String>(3);
variables.put("server", photo.getAttribute("server"));
variables.put("id", photo.getAttribute("id"));
variables.put("secret", photo.getAttribute("secret"));
String photoUrl = "http://static.flickr.com/{server}/{id}_{secret}_m.jpg";
return restTemplate.getForObject(photoUrl, BufferedImage.class, variables);
}
});
For instance, given the XML document given above, the imageList will contain 4 images. The URL for the first image retrieved will be http://static.flickr.com/2/2636_ a123456_m.jpg, the second is http://static.flickr.com/2/2635_ b123456_m.jpg, etc.
Converting the images
There is one more thing that needs to be done in order for the code to work: we will need to write a HttpMessageConverter that is able to read from the HTTP response, and create a BufferedImagefrom that. Doing so with the Java Image I/O API is fairly simple, we just need to implement the read() method defined in the HttpMessageConverter interface. Overall, our simple converter looks like this:
public class BufferedImageHttpMessageConverter implements HttpMessageConverter<BufferedImage> {
public List<MediaType> getSupportedMediaTypes() {
return Collections.singletonList(new MediaType("image", "jpeg"));
}
public boolean supports(Class<? extends BufferedImage> clazz) {
return BufferedImage.class.equals(clazz);
}
public BufferedImage read(Class<BufferedImage> clazz, HttpInputMessage inputMessage) throws IOException {
return ImageIO.read(inputMessage.getBody());
}
public void write(BufferedImage image, HttpOutputMessage message) throws IOException {
throw new UnsupportedOperationException("Not implemented");
}
}
Note that we didn't implement write() because we are not uploading images, just downloading them. Now we just have to plug this converter into the RestTemplate. We do that in the Spring application context:
<beans xmlns="http://www.springframework.org/schema/beans"
xmlns:xsi="http://www.w3.org/2001/XMLSchema-instance"
xsi:schemaLocation="http://www.springframework.org/schema/beans http://www.springframework.org/schema/beans/spring-beans.xsd">
<bean id="flickrClient" class="com.springsource.samples.resttemplate.FlickrClient">
<constructor-arg ref="restTemplate"/>
<constructor-arg ref="xpathTemplate"/>
</bean>
<bean id="restTemplate" class="org.springframework.web.client.RestTemplate">
<property name="messageConverters">
<list>
<bean class="org.springframework.http.converter.xml.SourceHttpMessageConverter"/>
<bean class="com.springsource.samples.resttemplate.BufferedImageHttpMessageConverter"/>
</list>
</property>
</bean>
<bean id="xpathTemplate" class="org.springframework.xml.xpath.Jaxp13XPathTemplate"/>
</beans>
Showing the photos
The final stage is to show the photos in a simple GUI. For this, we use Swing:
JFrame frame = new JFrame(searchTerm + " photos");
frame.setLayout(new GridLayout(2, imageList.size() / 2));
for (BufferedImage image : imageList) {
frame.add(new JLabel(new ImageIcon(image)));}
frame.setDefaultCloseOperation(JFrame.EXIT_ON_CLOSE);
frame.pack();frame.setVisible(true);
which gives us the following:
Integrating Spring with other web frameworks
This chapter details Spring's integration with third party web frameworks such as JSF, Struts.
One of the core value propositions of the Spring Framework is that of enabling choice. In a general sense, Spring does not force one to use or buy into any particular architecture, technology, or methodology (although it certainly recommends some over others). This freedom to pick and choose the architecture, technology, or methodology that is most relevant to a developer and his or her development team is arguably most evident in the web area, where Spring provides its own web framework (Spring MVC), while at the same time providing integration with a number of popular third party web frameworks. This allows one to continue to leverage any and all of the skills one may have acquired in a particular web framework such as Struts, while at the same time being able to enjoy the benefits afforded by Spring in other areas such as data access, declarative transaction management, and flexible configuration and application assembly.
a)Common configuration
Before diving into the integration specifics of each supported web framework, let us first take a look at the Spring configuration that is not specific to any one web framework. (This section is equally applicable to Spring's own web framework, Spring MVC.)
One of the concepts (for want of a better word) espoused by (Spring's) lightweight application model is that of a layered architecture. Remember that in a 'classic' layered architecture, the web layer is but one of many layers; it serves as one of the entry points into a server side application and it delegates to service objects (facades) defined in a service layer to satisfy business specific (and presentation-technology agnostic) use cases. In Spring, these service objects, any other business-specific objects, data access objects, etc. exist in a distinct 'business context', which contains no web or presentation layer objects (presentation objects such as Spring MVC controllers are typically configured in a distinct 'presentation context'). This section details how one configures a Spring container (a WebApplicationContext) that contains all of the 'business beans' in one's application.
On to specifics: all that one need do is to declare a ContextLoaderListener in the standard Java EE servlet web.xml file of one's web application, and add a contextConfigLocation <context-param/> section (in the same file) that defines which set of Spring XML configuration files to load.
Find below the <listener/> configuration:
<listener>
<listener-class>org.springframework.web.context.ContextLoaderListener</listener-class>
</listener>
Find below the <context-param/> configuration:
<context-param>
<param-name>contextConfigLocation</param-name>
<param-value>/WEB-INF/applicationContext*.xml</param-value>
</context-param>
If you don't specify the contextConfigLocation context parameter, the ContextLoaderListener will look for a file called /WEB-INF/applicationContext.xml to load. Once the context files are loaded, Spring creates a WebApplicationContext object based on the bean definitions and stores it in the ServletContext of the web application.
All Java web frameworks are built on top of the Servlet API, and so one can use the following code snippet to get access to this 'business context' ApplicationContext created by the ContextLoaderListener.
WebApplicationContext ctx = WebApplicationContextUtils.getWebApplicationContext(servletContext);
The WebApplicationContextUtils class is for convenience, so you don't have to remember the name of the ServletContext attribute. Its getWebApplicationContext() method will return null if an object doesn't exist under the WebApplicationContext.ROOT_WEB_APPLICATION_CONTEXT_ATTRIBUTE key. Rather than risk getting NullPointerExceptions in your application, it's better to use the getRequiredWebApplicationContext() method. This method throws an exception when the ApplicationContext is missing.
Once you have a reference to the WebApplicationContext, you can retrieve beans by their name or type. Most developers retrieve beans by name and then cast them to one of their implemented interfaces.
Fortunately, most of the frameworks in this section have simpler ways of looking up beans. Not only do they make it easy to get beans from a Spring container, but they also allow you to use dependency injection on their controllers. Each web framework section has more detail on its specific integration strategies.
JavaServer Faces 1.1 and 1.2
JavaServer Faces (JSF) is the JCP's standard component-based, event-driven web user interface framework. As of Java EE 5, it is an official part of the Java EE umbrella.
For a popular JSF runtime as well as for popular JSF component libraries, check out the Apache MyFaces project. The MyFaces project also provides common JSF extensions such as MyFaces Orchestra: a Spring-based JSF extension that provides rich conversation scope support.
Note Spring Web Flow 2.0 provides rich JSF support through its newly established Spring Faces module, both for JSF-centric usage (as described in this section) and for Spring-centric usage (using JSF views within a Spring MVC dispatcher). Check out the Spring Web Flow website for details!
The key element in Spring's JSF integration is the JSF 1.1 VariableResolver mechanism. On JSF 1.2, Spring supports the ELResolver mechanism as a next-generation version of JSF EL integration.
DelegatingVariableResolver (JSF 1.1/1.2)
The easiest way to integrate one's Spring middle-tier with one's JSF web layer is to use the DelegatingVariableResolver class. To configure this variable resolver in one's application, one will need to edit one's faces-context.xml file. After the opening <faces-config/> element, add an <application/> element and a <variable-resolver/> element within it. The value of the variable resolver should reference Spring's DelegatingVariableResolver;
for example:
<faces-config>
<application>
<variable-resolver>org.springframework.web.jsf.DelegatingVariableResolver</variable-resolver>
<locale-config>
<default-locale>en</default-locale>
<supported-locale>en</supported-locale>
<supported-locale>es</supported-locale>
</locale-config>
<message-bundle>messages</message-bundle>
</application>
</faces-config>
The DelegatingVariableResolver will first delegate value lookups to the default resolver of the underlying JSF implementation and then to Spring's 'business context' WebApplicationContext. This allows one to easily inject dependencies into one's JSF-managed beans.
Managed beans are defined in one's faces-config.xml file. Find below an example where #{userManager} is a bean that is retrieved from the Spring 'business context'.
<managed-bean>
<managed-bean-name>userList</managed-bean-name>
<managed-bean-class>com.whatever.jsf.UserList</managed-bean-class>
<managed-bean-scope>request</managed-bean-scope>
<managed-property>
<property-name>userManager</property-name>
<value>#{userManager}</value>
</managed-property>
</managed-bean>
SpringBeanVariableResolver (JSF 1.1/1.2)
SpringBeanVariableResolver is a variant of DelegatingVariableResolver. It delegates to the Spring's 'business context' WebApplicationContext first and then to the default resolver of the underlying JSF implementation. This is useful in particular when using request/session-scoped beans with special Spring resolution rules, e.g. Spring FactoryBean implementations.
Configuration-wise, simply define SpringBeanVariableResolver in your faces-context.xml file:
<faces-config>
<application>
<variable-resolver>org.springframework.web.jsf.SpringBeanVariableResolver</variable-resolver>
...
</application>
</faces-config>
SpringBeanFacesELResolver (JSF 1.2+)
SpringBeanFacesELResolver is a JSF 1.2 compliant ELResolver implementation, integrating with the standard Unified EL as used by JSF 1.2 and JSP 2.1. Like SpringBeanVariableResolver, it delegates to the Spring's 'business context' WebApplicationContext first, then to the default resolver of the underlying JSF implementation.
Configuration-wise, simply define SpringBeanFacesELResolver in your JSF 1.2 faces-context.xml file:
<faces-config>
<application>
<el-resolver>org.springframework.web.jsf.el.SpringBeanFacesELResolver</el-resolver>
...
</application>
</faces-config>
FacesContextUtils
A custom VariableResolver works well when mapping one's properties to beans in faces-config.xml, but at times one may need to grab a bean explicitly. The FacesContextUtils class makes this easy. It is similar to WebApplicationContextUtils, except that it takes a FacesContext parameter rather than a ServletContext parameter.
ApplicationContext ctx = FacesContextUtils.getWebApplicationContext(FacesContext.getCurrentInstance());
Apache Struts 1.x and 2.x
Struts used to be the de facto web framework for Java applications, mainly because it was one of the first to be released (June 2001). It has now been renamed to Struts 1 (as opposed to Struts 2). Many applications still use it. Invented by Craig McClanahan, Struts is an open source project hosted by the Apache Software Foundation. At the time, it greatly simplified the JSP/Servlet programming paradigm and won over many developers who were using proprietary frameworks. It simplified the programming model, it was open source (and thus free as in beer), and it had a large community, which allowed the project to grow and become popular among Java web developers.
Note The following section discusses Struts 1 a.k.a. "Struts Classic".
Struts 2 is effectively a different product - a successor of WebWork 2.2 (as discussed in Section 18.5, “WebWork 2.x”), carrying the Struts brand now. Check out the Struts 2 Spring Plugin for the built-in Spring integration shipped with Struts 2. In general, Struts 2 is closer to WebWork 2.2 than to Struts 1 in terms of its Spring integration implications.
To integrate your Struts 1.x application with Spring, you have two options:
- Configure Spring to manage your Actions as beans, using the ContextLoaderPlugin, and set their dependencies in a Spring context file.
- Subclass Spring's ActionSupport classes and grab your Spring-managed beans explicitly using a getWebApplicationContext() method.
The ContextLoaderPlugin is a Struts 1.1+ plug-in that loads a Spring context file for the Struts ActionServlet. This context refers to the root WebApplicationContext (loaded by the ContextLoaderListener) as its parent. The default name of the context file is the name of the mapped servlet, plus -servlet.xml. If ActionServlet is defined in web.xml as <servlet-name>action</servlet-name>, the default is /WEB-INF/action-servlet.xml.
To configure this plug-in, add the following XML to the plug-ins section near the bottom of your struts-config.xml file:
<plug-in className="org.springframework.web.struts.ContextLoaderPlugIn"/>
The location of the context configuration files can be customized using the 'contextConfigLocation' property.
<plug-in className="org.springframework.web.struts.ContextLoaderPlugIn">
<set-property property="contextConfigLocation" value="/WEB-INF/action-servlet.xml,/WEB-INF/applicationContext.xml"/>
</plug-in>
It is possible to use this plugin to load all your context files, which can be useful when using testing tools like StrutsTestCase. StrutsTestCase's MockStrutsTestCase won't initialize Listeners on startup so putting all your context files in the plugin is a workaround. (A bug has been filed for this issue, but has been closed as 'Wont Fix').
After configuring this plug-in in struts-config.xml, you can configure your Action to be managed by Spring. Spring (1.1.3+) provides two ways to do this:
- Override Struts' default RequestProcessor with Spring's DelegatingRequestProcessor.
- Use the DelegatingActionProxy class in the type attribute of your <action-mapping>.
<action path="/users" .../>
You must define that Action's bean with the "/users" name in action-servlet.xml:
<bean name="/users" .../>
1.1 DelegatingRequestProcessor
To configure the DelegatingRequestProcessor in your struts-config.xml file, override the "processorClass" property in the <controller> element. These lines follow the <action-mapping> element.
<controller>
<set-property property="processorClass" value="org.springframework.web.struts.DelegatingRequestProcessor"/>
</controller>
After adding this setting, your Action will automatically be looked up in Spring's context file, no matter what the type. In fact, you don't even need to specify a type. Both of the following snippets will work:
<action path="/user" /> <action path="/user"/>
If you're using Struts' modules feature, your bean names must contain the module prefix. For example, an action defined as <action path="/user"/> with module prefix "admin" requires a bean name with <bean name="/admin/user"/>.
Note If you are using Tiles in your Struts application, you must configure your <controller> with the DelegatingTilesRequestProcessor instead.
1.2 DelegatingActionProxy
If you have a custom RequestProcessor and can't use the DelegatingRequestProcessor or DelegatingTilesRequestProcessor approaches, you can use the DelegatingActionProxy as the type in your action-mapping.
<action path="/user" name="userForm" scope="request" validate="false" parameter="method"> <forward name="list" path="/userList.jsp"/> <forward name="edit" path="/userForm.jsp"/> </action>
The bean definition in action-servlet.xml remains the same, whether you use a custom RequestProcessor or the DelegatingActionProxy.
If you define your Action in a context file, the full feature set of Spring's bean container will be available for it: dependency injection as well as the option to instantiate a new Action instance for each request. To activate the latter, add scope="prototype" to your Action's bean definition.
<bean name="/user" scope="prototype" autowire="byName" />
2 ActionSupport Classes
As previously mentioned, you can retrieve the WebApplicationContext from the ServletContext using the WebApplicationContextUtils class. An easier way is to extend Spring's Action classes for Struts. For example, instead of subclassing Struts' Action class, you can subclass Spring's ActionSupport class.
The ActionSupport class provides additional convenience methods, like getWebApplicationContext(). Below is an example of how you might use this in an Action:
public class UserAction extends DispatchActionSupport {
public ActionForward execute(ActionMapping mapping, ActionForm form, HttpServletRequest request, HttpServletResponse response) throws Exception {
if (log.isDebugEnabled()) {
log.debug("entering 'delete' method...");
}
WebApplicationContext ctx = getWebApplicationContext();
UserManager mgr = (UserManager) ctx.getBean("userManager"); // talk to manager for business logic return mapping.findForward("success");
}
}
Spring includes subclasses for all of the standard Struts Actions - the Spring versions merely have Support appended to the name:
The recommended strategy is to use the approach that best suits your project. Subclassing makes your code more readable, and you know exactly how your dependencies are resolved. In contrast, using the ContextLoaderPlugin allows you to easily add new dependencies in your context XML file. Either way, Spring provides some nice options for integrating with Struts.
JSF 2 + Spring 3 integration example
In this tutorial, we will show you how to integrate JSF 2.0 with Spring 3 using :
- JSF XML faces-config.xml
- Spring annotations
- JSR-330 standard injection
- JSF 2.1.13
- Spring 3.1.2.RELEASE
- Maven 3
- Eclipse 4.2
- Tomcat 6 or 7
1. Directory Structure
A standard Maven project for demonstration.
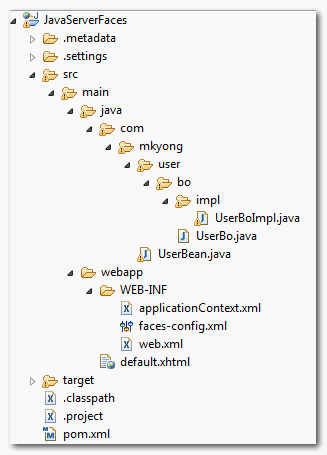
2. Project Dependencies
Declares JSF 2, Spring 3, JSR-330 inject, and Tomcat’s dependencies.
pom.xml
<project xmlns="http://maven.apache.org/POM/4.0.0"
xmlns:xsi="http://www.w3.org/2001/XMLSchema-instance"
xsi:schemaLocation="http://maven.apache.org/POM/4.0.0
http://maven.apache.org/maven-v4_0_0.xsd">
<modelVersion>4.0.0</modelVersion>
<groupId>com.mkyong.common</groupId>
<artifactId>JavaServerFaces</artifactId>
<packaging>war</packaging>
<version>1.0-SNAPSHOT</version>
<name>JavaServerFaces Maven Webapp</name>
<url>http://maven.apache.org</url>
<dependencies>
<!-- Spring framework -->
<dependency>
<groupId>org.springframework</groupId>
<artifactId>spring-core</artifactId>
<version>3.1.2.RELEASE</version>
</dependency>
<dependency>
<groupId>org.springframework</groupId>
<artifactId>spring-web</artifactId>
<version>3.1.2.RELEASE</version>
</dependency>
<!-- JSR-330 -->
<dependency>
<groupId>javax.inject</groupId>
<artifactId>javax.inject</artifactId>
<version>1</version>
</dependency>
<!-- JSF -->
<dependency>
<groupId>com.sun.faces</groupId>
<artifactId>jsf-api</artifactId>
<version>2.1.13</version>
</dependency>
<dependency>
<groupId>com.sun.faces</groupId>
<artifactId>jsf-impl</artifactId>
<version>2.1.13</version>
</dependency>
<dependency>
<groupId>javax.servlet</groupId>
<artifactId>jstl</artifactId>
<version>1.2</version>
</dependency>
<dependency>
<groupId>javax.servlet</groupId>
<artifactId>servlet-api</artifactId>
<version>2.5</version>
</dependency>
<dependency>
<groupId>javax.servlet.jsp</groupId>
<artifactId>jsp-api</artifactId>
<version>2.1</version>
</dependency>
<!-- EL -->
<dependency>
<groupId>org.glassfish.web</groupId>
<artifactId>el-impl</artifactId>
<version>2.2</version>
</dependency>
<!-- Tomcat 6 need this -->
<dependency>
<groupId>com.sun.el</groupId>
<artifactId>el-ri</artifactId>
<version>1.0</version>
</dependency>
</dependencies>
<build>
<finalName>JavaServerFaces</finalName>
<plugins>
<plugin>
<groupId>org.apache.maven.plugins</groupId>
<artifactId>maven-compiler-plugin</artifactId>
<version>2.3.1</version>
<configuration>
<source>1.6</source>
<target>1.6</target>
</configuration>
</plugin>
</plugins>
</build>
</project>
3. JSF 2 + Spring Integration
Spring’s bean in Spring Ioc context, and JSF’s managed bean in JSF Ioc context, how to make both working together? The solution is defined Spring’s SpringBeanFacesELResolver in faces-config.xml. Check this official Spring guide.
faces-config.xml
<?xml version="1.0" encoding="UTF-8"?>
<faces-config
xmlns="http://java.sun.com/xml/ns/javaee"
xmlns:xsi="http://www.w3.org/2001/XMLSchema-instance"
xsi:schemaLocation="http://java.sun.com/xml/ns/javaee
http://java.sun.com/xml/ns/javaee/web-facesconfig_2_1.xsd"
version="2.1">
<application>
<el-resolver> org.springframework.web.jsf.el.SpringBeanFacesELResolver </el-resolver> </application>
</faces-config>
See following 3 examples to inject Spring’s bean in JSF managed bean.
3.1. XML Schema Example
Many developers still prefer to use XML to manage beans. With SpringBeanFacesELResolver, just uses EL ${userBo} to inject Spring’s bean into JSF’s managed bean.
UserBo.java
package com.mkyong.user.bo;
public interface UserBo{
public String getMessage();
}
UserBoImpl.java
package com.mkyong.user.bo.impl;
import com.mkyong.user.bo.UserBo;
public class UserBoImpl implements UserBo{
public String getMessage() {
return "JSF 2 + Spring Integration";
}
}
UserBean.java – JSF backing bean
package com.mkyong;
import java.io.Serializable;
import com.mkyong.user.bo.UserBo;
public class UserBean{ //later inject in faces-config.xml
UserBo userBo;
public void setUserBo(UserBo userBo) {
this.userBo = userBo;
}
public String printMsgFromSpring() {
return userBo.getMessage();
}
}
applicationContext.xml – Declares userBo bean
<beans xmlns="http://www.springframework.org/schema/beans"
xmlns:xsi="http://www.w3.org/2001/XMLSchema-instance" xsi:schemaLocation="http://www.springframework.org/schema/beans
http://www.springframework.org/schema/beans/spring-beans-2.5.xsd">
<bean id="userBo" >
</bean>
</beans>
faces-config.xml – Declares managed bean and inject userBo
<?xml version="1.0" encoding="UTF-8"?>
<faces-config
xmlns="http://java.sun.com/xml/ns/javaee"
xmlns:xsi="http://www.w3.org/2001/XMLSchema-instance"
xsi:schemaLocation="http://java.sun.com/xml/ns/javaee
http://java.sun.com/xml/ns/javaee/web-facesconfig_2_0.xsd" version="2.0">
<managed-bean>
<managed-bean-name>user</managed-bean-name>
<managed-bean-class>com.mkyong.UserBean</managed-bean-class>
<managed-bean-scope>session</managed-bean-scope>
<managed-property>
<property-name>userBo</property-name>
<value>#{userBo}</value>
</managed-property>
</managed-bean>
</faces-config>
3.2. Spring Annotations – Auto Scan
This example is using Spring annotations. Injects like a normal bean with @ManagedBean, @Autowired and @Component, it just works as expected.
UserBoImpl.java
package com.mkyong.user.bo.impl;
import org.springframework.stereotype.Service;
import com.mkyong.user.bo.UserBo;
@Service
public class UserBoImpl implements UserBo{
public String getMessage() {
return "JSF 2 + Spring Integration";
}
}
UserBean.java
package com.mkyong;
import javax.faces.bean.ManagedBean;
import javax.faces.bean.SessionScoped;
import org.springframework.beans.factory.annotation.Autowired;
import org.springframework.stereotype.Component;
import com.mkyong.user.bo.UserBo;
@Component
@ManagedBean
@SessionScoped
public class UserBean{
@Autowired UserBo userBo;
public void setUserBo(UserBo userBo) {
this.userBo = userBo;
}
public String printMsgFromSpring() {
return userBo.getMessage();
}
}
applicationContext.xml – Enable the component auto scan
<beans xmlns="http://www.springframework.org/schema/beans"
xmlns:xsi="http://www.w3.org/2001/XMLSchema-instance"
xmlns:context="http://www.springframework.org/schema/context"
xsi:schemaLocation="http://www.springframework.org/schema/beans
http://www.springframework.org/schema/beans/spring-beans-3.1.xsd
http://www.springframework.org/schema/context
http://www.springframework.org/schema/context/spring-context-3.1.xsd">
<context:component-scan base-package="com.mkyong" />
</beans>
Mixed use of both JSF and Spring annotations are working fine, but it look weird and duplicated – @Component and @ManagedBean together. Actually, you can just uses a single @Component, see following new version, it’s pure Spring, and it works!
UserBean.java
package com.mkyong;
import org.springframework.beans.factory.annotation.Autowired;
import org.springframework.context.annotation.Scope;
import org.springframework.stereotype.Component;
import com.mkyong.user.bo.UserBo;
@Component @Scope("session")
public class UserBean{
@Autowired UserBo userBo;
public void setUserBo(UserBo userBo) {
this.userBo = userBo;
}
public String printMsgFromSpring() {
return userBo.getMessage();
}
}
3.3. JSR-330 Annotation
Since Spring 3.0, Spring offer supports for JSR-330 injection standard. Now, you can use @Inject to replace for @Autowired and @Named for @Component. This is recommended to solution, follow JSR-330 standard make the application more portable to other environments, and it works fine in Spring framework.
UserBoImpl.java
package com.mkyong.user.bo.impl;
import javax.inject.Named;
import com.mkyong.user.bo.UserBo;
@Named
public class UserBoImpl implements UserBo{
public String getMessage() {
return "JSF 2 + Spring Integration";
}
}
UserBean.java
package com.mkyong;
import javax.inject.Inject;
import javax.inject.Named;
import org.springframework.context.annotation.Scope;
import com.mkyong.user.bo.UserBo;
@Named @Scope("session") //need this, JSR-330 in Spring context is singleton by default
public class UserBean {
@Inject UserBo userBo;
public void setUserBo(UserBo userBo) {
this.userBo = userBo;
}
public String printMsgFromSpring() {
return userBo.getMessage();
}
}
applicationContext.xml – Need component auto scan also
<beans xmlns="http://www.springframework.org/schema/beans"
xmlns:xsi="http://www.w3.org/2001/XMLSchema-instance"
xmlns:context="http://www.springframework.org/schema/context"
xsi:schemaLocation="http://www.springframework.org/schema/beans
http://www.springframework.org/schema/beans/spring-beans-3.1.xsd
http://www.springframework.org/schema/context
http://www.springframework.org/schema/context/spring-context-3.1.xsd">
<context:component-scan base-package="com.mkyong" />
</beans>
4. Demo
Example in 3.1, 3.2 and 3.3 are doing exactly the thing – Inject userBo into JSF bean, just different implementation. Now, create a simple JSF page to show the the result.
default.xhtml
<?xml version="1.0" encoding="UTF-8"?>
<!DOCTYPE html PUBLIC "-//W3C//DTD XHTML 1.0 Transitional//EN" "http://www.w3.org/TR/xhtml1/DTD/xhtml1-transitional.dtd">
<html xmlns="http://www.w3.org/1999/xhtml" xmlns:h="http://java.sun.com/jsf/html" >
<h:body>
<h1>JSF 2.0 + Spring Example</h1> #{userBean.printMsgFromSpring()}
</h:body>
</html>
web.xml
<?xml version="1.0" encoding="UTF-8"?>
<web-app xmlns:xsi="http://www.w3.org/2001/XMLSchema-instance"
xmlns="http://java.sun.com/xml/ns/javaee"
xmlns:web="http://java.sun.com/xml/ns/javaee/web-app_2_5.xsd"
xsi:schemaLocation="http://java.sun.com/xml/ns/javaee
http://java.sun.com/xml/ns/javaee/web-app_2_5.xsd" id="WebApp_ID" version="2.5">
<display-name>JavaServerFaces</display-name>
<!-- Add Support for Spring -->
<listener>
<listener-class> org.springframework.web.context.ContextLoaderListener </listener-class>
</listener>
<listener>
<listener-class> org.springframework.web.context.request.RequestContextListener </listener-class> </listener>
<!-- Change to "Production" when you are ready to deploy -->
<context-param>
<param-name>javax.faces.PROJECT_STAGE</param-name>
<param-value>Development</param-value> </context-param>
<!-- Welcome page -->
<welcome-file-list>
<welcome-file>default.jsf</welcome-file>
</welcome-file-list>
<!-- JSF Mapping -->
<servlet>
<servlet-name>facesServlet</servlet-name>
<servlet-class>javax.faces.webapp.FacesServlet</servlet-class>
<load-on-startup>1</load-on-startup>
</servlet>
<servlet-mapping>
<servlet-name>facesServlet</servlet-name>
<url-pattern>*.jsf</url-pattern>
</servlet-mapping>
<servlet-mapping>
<servlet-name>facesServlet</servlet-name>
<url-pattern>*.xhtml</url-pattern>
</servlet-mapping>
</web-app>
Done, see output : http://localhost:8080/JavaServerFaces/default.jsf
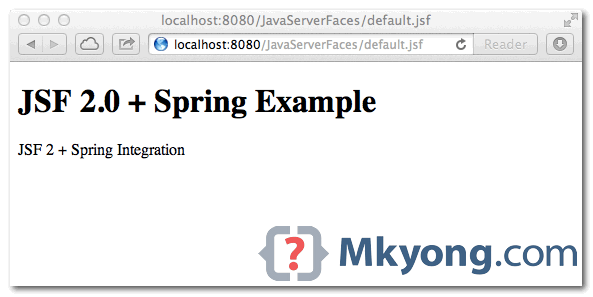
References
JSF 2.0 + Spring + Hibernate integration example
Here’s a long article to show you how to integrate JSF 2.0, Spring and Hibernate together. At the end of the article, you will create a page which display a list of the existing customer from database and a “add customer” function to allow user to add a new customer into database.
P.S In this example, we are using MySQL database and deploy to Tomcat 6 web container.
1. Project Structure
Directory structure of this example
- Spring reference – SpringBeanFacesELResolver
- Spring how to do dependency injection in your session listener
- Spring 3 and JSR-330 @Inject and @Named example
JSF 2.0 + Spring + Hibernate integration example
Here’s a long article to show you how to integrate JSF 2.0, Spring and Hibernate together. At the end of the article, you will create a page which display a list of the existing customer from database and a “add customer” function to allow user to add a new customer into database.
P.S In this example, we are using MySQL database and deploy to Tomcat 6 web container.
1. Project Structure
Directory structure of this example
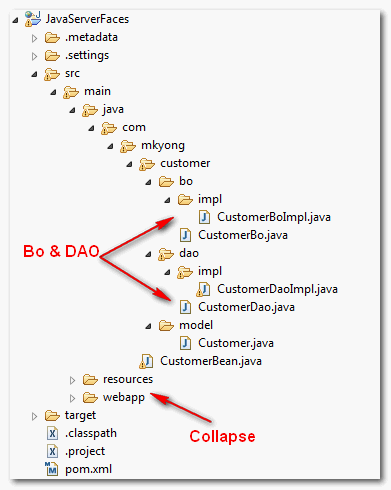
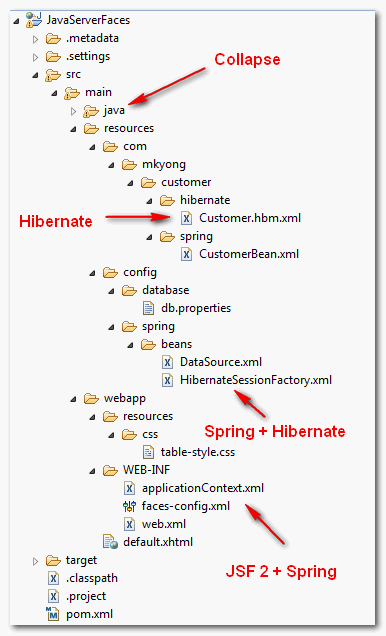
2. Table Script
Create a customer table and insert 2 dummy records.
DROP TABLE IF EXISTS `mkyongdb`.`customer`;
CREATE TABLE `mkyongdb`.`customer` (
`CUSTOMER_ID` BIGINT(20) UNSIGNED NOT NULL AUTO_INCREMENT,
`NAME` VARCHAR(45) NOT NULL,
`ADDRESS` VARCHAR(255) NOT NULL,
`CREATED_DATE` datetime NOT NULL,
PRIMARY KEY (`CUSTOMER_ID`) )
ENGINE=InnoDB AUTO_INCREMENT=17 DEFAULT CHARSET=utf8;
INSERT INTO mkyongdb.customer(customer_id, name, address, created_date) VALUES(1, 'mkyong1', 'address1', now());
INSERT INTO mkyongdb.customer(customer_id, name, address, created_date) VALUES(2, 'mkyong2', 'address2', now());
3. Hibernate Stuff
A model class and Hibernate mapping file for customer table.
File : Customer.java
package com.mkyong.customer.model;
import java.util.Date;
public class Customer
{
public long customerId;
public String name;
public String address;
public Date createdDate;
//getter and setter methods
}
File : Customer.hbm.xml
<?xml version="1.0"?>
<!DOCTYPE hibernate-mapping PUBLIC "-//Hibernate/Hibernate Mapping DTD 3.0//EN" "http://hibernate.sourceforge.net/hibernate-mapping-3.0.dtd">
<hibernate-mapping>
<class name="com.mkyong.customer.model.Customer" table="customer" catalog="mkyongdb">
<id name="customerId" > <column name="CUSTOMER_ID" /> <generator /> </id>
<property name="name" > <column name="NAME" length="45" not-null="true" />
</property>
<property name="address" > <column name="ADDRESS" not-null="true" />
</property>
<property name="createdDate" > <column name="CREATED_DATE" length="19" not-null="true" />
</property>
</class>
</hibernate-mapping>
4. Spring Stuff
Spring’s BO and DAO classes for business logic and database interaction.
File : CustomerBo.java
package com.mkyong.customer.bo;
import java.util.List;
import com.mkyong.customer.model.Customer;
public interface CustomerBo
{
void addCustomer(Customer customer);
List<Customer> findAllCustomer();
}
File : CustomerBoImpl.java
package com.mkyong.customer.bo.impl;
import java.util.List;
import com.mkyong.customer.bo.CustomerBo;
import com.mkyong.customer.dao.CustomerDao;
import com.mkyong.customer.model.Customer;
public class CustomerBoImpl implements CustomerBo
{
CustomerDao customerDao;
public void setCustomerDao(CustomerDao customerDao) {
this.customerDao = customerDao;
}
public void addCustomer(Customer customer){
customerDao.addCustomer(customer);
}
public List<Customer> findAllCustomer(){
return customerDao.findAllCustomer();
}
}
File : CustomerDao.java
package com.mkyong.customer.dao;
import java.util.List;
import com.mkyong.customer.model.Customer;
public interface CustomerDao
{
void addCustomer(Customer customer);
List<Customer> findAllCustomer();
}
File : CustomerDaoImpl.java
package com.mkyong.customer.dao.impl;
import java.util.Date;
import java.util.List;
import com.mkyong.customer.dao.CustomerDao;
import com.mkyong.customer.model.Customer;
import org.springframework.orm.hibernate3.support.HibernateDaoSupport;
public class CustomerDaoImpl extends HibernateDaoSupport implements CustomerDao{
public void addCustomer(Customer customer){
customer.setCreatedDate(new Date());
getHibernateTemplate().save(customer);
}
public List<Customer> findAllCustomer(){
return getHibernateTemplate().find("from Customer");
}
}
File : CustomerBean.xml
<?xml version="1.0" encoding="UTF-8"?>
<beans xmlns="http://www.springframework.org/schema/beans"
xmlns:xsi="http://www.w3.org/2001/XMLSchema-instance" xsi:schemaLocation="http://www.springframework.org/schema/beans
http://www.springframework.org/schema/beans/spring-beans-2.5.xsd">
<bean id="customerBo" > <property name="customerDao" ref="customerDao" />
</bean>
<bean id="customerDao" > <property name="sessionFactory" ref="sessionFactory" />
</bean>
</beans>
5. Spring + Database
Configure database detail in Spring.
File : db.properties
jdbc.driverClassName=com.mysql.jdbc.Driver
jdbc.url=jdbc:mysql://localhost:3306/mkyongdb
jdbc.username=root jdbc.password=password
File : DataSource.xml
<beans xmlns="http://www.springframework.org/schema/beans"
xmlns:xsi="http://www.w3.org/2001/XMLSchema-instance" xsi:schemaLocation="http://www.springframework.org/schema/beans
http://www.springframework.org/schema/beans/spring-beans-2.5.xsd">
<bean >
<property name="location">
<value>WEB-INF/classes/config/database/db.properties</value>
</property>
</bean>
<bean id="dataSource" >
<property name="driverClassName" value="${jdbc.driverClassName}" />
<property name="url" value="${jdbc.url}" />
<property name="username" value="${jdbc.username}" />
<property name="password" value="${jdbc.password}" />
</bean>
</beans>
6. Spring + Hibernate
Integrate Hibernate and Spring via LocalSessionFactoryBean.
File : HibernateSessionFactory.xml
<?xml version="1.0" encoding="UTF-8"?>
<beans xmlns="http://www.springframework.org/schema/beans"
xmlns:xsi="http://www.w3.org/2001/XMLSchema-instance" xsi:schemaLocation="http://www.springframework.org/schema/beans
http://www.springframework.org/schema/beans/spring-beans-2.5.xsd">
<!-- Hibernate session factory -->
<bean id="sessionFactory" >
<property name="dataSource"> <ref bean="dataSource"/>
</property>
<property name="hibernateProperties">
<props>
<prop key="hibernate.dialect">org.hibernate.dialect.MySQLDialect</prop>
<prop key="hibernate.show_sql">true</prop>
</props>
</property>
<property name="mappingResources">
<list>
<value>com/mkyong/customer/hibernate/Customer.hbm.xml</value>
</list>
</property>
</bean>
</beans>
7. JSF 2.0
JSF managed bean to call Spring’s BO to add or get customer’s records from database.
File : CustomerBean.java
package com.mkyong;
import java.io.Serializable; import java.util.List;
import com.mkyong.customer.bo.CustomerBo;
import com.mkyong.customer.model.Customer;
public class CustomerBean implements Serializable
{
//DI via Spring CustomerBo customerBo;
public String name;
public String address;
//getter and setter methods
public void setCustomerBo(CustomerBo customerBo) {
this.customerBo = customerBo;
}
//get all customer data from database
public List<Customer> getCustomerList(){
return customerBo.findAllCustomer();
}
//add a new customer data into database
public String addCustomer(){
Customer cust = new Customer();
cust.setName(getName());
cust.setAddress(getAddress());
customerBo.addCustomer(cust);
clearForm();
return "";
}
//clear form values private void clearForm(){
setName("");
setAddress("");
}
}
A JSF page to display existing customer records via h:dataTable and a few text components to allow user to insert new customer record into database.
File : default.xhtml
<?xml version="1.0" encoding="UTF-8"?>
<!DOCTYPE html PUBLIC "-//W3C//DTD XHTML 1.0 Transitional//EN"
"http://www.w3.org/TR/xhtml1/DTD/xhtml1-transitional.dtd">
<html xmlns="http://www.w3.org/1999/xhtml"
xmlns:h="http://java.sun.com/jsf/html"
xmlns:f="http://java.sun.com/jsf/core" >
<h:head>
<h:outputStylesheet library="css" name="table-style.css" />
</h:head>
<h:body>
<h1>JSF 2.0 + Spring + Hibernate Example</h1>
<h:dataTable value="#{customer.getCustomerList()}" var="c" style header rowClasses="order-table-odd-row,order-table-even-row" >
<h:column>
<f:facet name="header"> Customer ID </f:facet> #{c.customerId}
</h:column>
<h:column>
<f:facet name="header"> Name </f:facet> #{c.name}
</h:column>
<h:column>
<f:facet name="header"> Address </f:facet> #{c.address}
</h:column>
<h:column>
<f:facet name="header"> Created Date </f:facet> #{c.createdDate}
</h:column>
</h:dataTable>
<h2>Add New Customer</h2>
<h:form>
<h:panelGrid columns="3"> Name :
<h:inputText id="name" value="#{customer.name}" size="20" required="true" label="Name" > </h:inputText>
<h:message for="name" /> Address :
<h:inputTextarea id="address" value="#{customer.address}" cols="30" rows="10" required="true" label="Address" >
</h:inputTextarea>
<h:message for="address" />
</h:panelGrid>
<h:commandButton value="Submit" action="#{customer.addCustomer()}" />
</h:form>
</h:body>
</html>
8. JSF 2.0 + SpringIntegrate JSF 2.0 with Spring, see detail explanation here – JSF 2.0 + Spring integration example
File : applicationContext.xml
<beans xmlns="http://www.springframework.org/schema/beans"
xmlns:xsi="http://www.w3.org/2001/XMLSchema-instance" xsi:schemaLocation="http://www.springframework.org/schema/beans
http://www.springframework.org/schema/beans/spring-beans-2.5.xsd">
<!-- Database Configuration -->
<import resource="classes/config/spring/beans/DataSource.xml"/>
<import resource="classes/config/spring/beans/HibernateSessionFactory.xml"/>
<!-- Beans Declaration -->
<import resource="classes/com/mkyong/customer/spring/CustomerBean.xml"/>
</beans>
File : faces-config.xml
<?xml version="1.0" encoding="UTF-8"?>
<faces-config xmlns="http://java.sun.com/xml/ns/javaee"
xmlns:xsi="http://www.w3.org/2001/XMLSchema-instance" xsi:schemaLocation="http://java.sun.com/xml/ns/javaee
http://java.sun.com/xml/ns/javaee/web-facesconfig_2_0.xsd" version="2.0">
<application>
<el-resolver> org.springframework.web.jsf.el.SpringBeanFacesELResolver </el-resolver>
</application>
<managed-bean>
<managed-bean-name>customer</managed-bean-name>
<managed-bean-class>com.mkyong.CustomerBean</managed-bean-class>
<managed-bean-scope>session</managed-bean-scope>
<managed-property>
<property-name>customerBo</property-name>
<value>#{customerBo}</value> </managed-property>
</managed-bean>
</faces-config>
File : web.xml
<?xml version="1.0" encoding="UTF-8"?>
<web-app xmlns:xsi="http://www.w3.org/2001/XMLSchema-instance"
xmlns="http://java.sun.com/xml/ns/javaee"
xmlns:web="http://java.sun.com/xml/ns/javaee/web-app_2_5.xsd" xsi:schemaLocation="http://java.sun.com/xml/ns/javaee
http://java.sun.com/xml/ns/javaee/web-app_2_5.xsd" id="WebApp_ID" version="2.5">
<display-name>JavaServerFaces</display-name>
<!-- Add Support for Spring -->
<listener>
<listener-class> org.springframework.web.context.ContextLoaderListener </listener-class>
</listener>
<listener>
<listener-class> org.springframework.web.context.request.RequestContextListener </listener-class> </listener>
<!-- Change to "Production" when you are ready to deploy -->
<context-param> <param-name>javax.faces.PROJECT_STAGE</param-name>
<param-value>Development</param-value>
</context-param>
<!-- Welcome page -->
<welcome-file-list>
<welcome-file>faces/default.xhtml</welcome-file>
</welcome-file-list>
<!-- JSF mapping -->
<servlet>
<servlet-name>Faces Servlet</servlet-name>
<servlet-class>javax.faces.webapp.FacesServlet</servlet-class>
<load-on-startup>1</load-on-startup>
</servlet>
<!-- Map these files with JSF -->
<servlet-mapping>
<servlet-name>Faces Servlet</servlet-name>
<url-pattern>/faces/*</url-pattern>
</servlet-mapping> <servlet-mapping>
<servlet-name>Faces Servlet</servlet-name>
<url-pattern>*.jsf</url-pattern>
</servlet-mapping>
<servlet-mapping>
<servlet-name>Faces Servlet</servlet-name>
<url-pattern>*.faces</url-pattern>
</servlet-mapping> <servlet-mapping>
<servlet-name>Faces Servlet</servlet-name>
<url-pattern>*.xhtml</url-pattern>
</servlet-mapping>
</web-app>
9. Demo
Run it, fill in the customer data and click on the “submit” button.